Difference between revisions of "Meetings"
From MyFacilityFitPro_Wiki
(→Description) |
(→Meetings Landing Page) (Tag: VisualEditor) |
||
| (12 intermediate revisions by one other user not shown) | |||
| Line 2: | Line 2: | ||
This functional area allows the user to schedule and track meetings, employee training and events happening throughout the facility using a monthly calendar. | This functional area allows the user to schedule and track meetings, employee training and events happening throughout the facility using a monthly calendar. | ||
| − | [[Image: | + | [[Image:MeetingLandingPage.png|900px]]<br /> |
| − | + | == Meetings Landing Page == | |
| − | + | '''A. Metrics''' | |
| − | + | ||
| − | + | ||
| − | + | *Training Participation - | |
| − | + | *Turnover Rate - | |
| − | + | *Terminations - | |
| − | * | + | |
| − | + | ||
| − | + | ||
| − | + | *New Hires - <br /> | |
| − | + | '''B. Calendar'''<br /> | |
| − | + | '''C. Filter'''<br /> | |
| − | + | '''D. Actions'''<br /> | |
| − | + | ||
| − | + | == Step-by-Step Help == | |
| + | === Actions === | ||
| + | {| class="wikitable" border="1" | ||
| + | |- | ||
| + | | [[Adding a Meeting]] | ||
| + | | [[Image:Add.png]] | ||
| + | | From the top right of the screen click the Add icon. Alternately double-click on a day in the calendar. | ||
| + | |- | ||
| + | | Search for a Meeting | ||
| + | | [[Image:Search.png]] | ||
| + | | Type key words in the Search box and hit enter on the keyboard. | ||
| + | |} | ||
| − | * | + | == Calendar == |
| − | + | The calendar displays its default view by current month with today highlighted. | |
| + | * Click on the '''month''', '''week''', or '''day''' to change the display view. | ||
| + | * Use the arrow buttons to move forward and backward in the selected view. | ||
| + | * Click on the '''today''' button to return to today's date.<br /> | ||
| − | + | [[Image:CalendarControls.png]] | |
| + | |||
| + | == Filtering == | ||
| + | # Use the '''Filter''' to select a '''Training''' course from the list. | ||
| + | # The filter is based on the '''month''', '''week''', or '''day''' you have selected as your display. | ||
| + | # Check the box if it is a course that is '''Paid by Aramark'''. | ||
| + | # Click the '''Apply''' button. | ||
| + | #* Training courses appear in the date boxes on the calendar. | ||
| + | # Click the '''Reset''' button to clear the filter.<br /> | ||
| + | |||
| + | [[Image:FilterTrainingResult.png]] | ||
Latest revision as of 08:42, 4 May 2016
Contents
Description
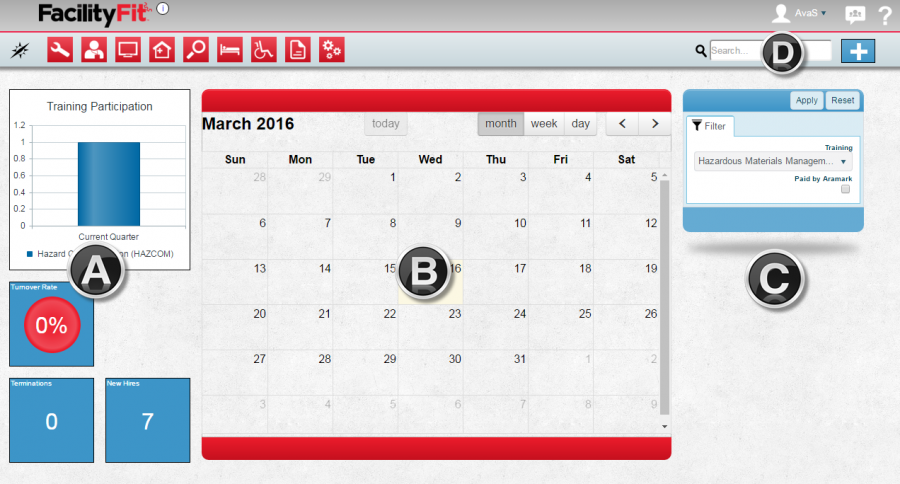
This functional area allows the user to schedule and track meetings, employee training and events happening throughout the facility using a monthly calendar.
Meetings Landing Page
A. Metrics
- Training Participation -
- Turnover Rate -
- Terminations -
- New Hires -
B. Calendar
C. Filter
D. Actions
Step-by-Step Help
Actions
| Adding a Meeting | |
From the top right of the screen click the Add icon. Alternately double-click on a day in the calendar. |
| Search for a Meeting | |
Type key words in the Search box and hit enter on the keyboard. |
Calendar
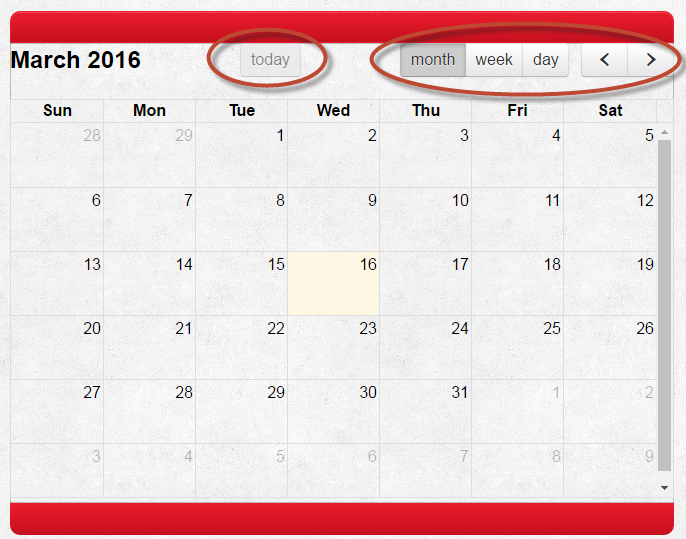
The calendar displays its default view by current month with today highlighted.
- Click on the month, week, or day to change the display view.
- Use the arrow buttons to move forward and backward in the selected view.
- Click on the today button to return to today's date.
Filtering
- Use the Filter to select a Training course from the list.
- The filter is based on the month, week, or day you have selected as your display.
- Check the box if it is a course that is Paid by Aramark.
- Click the Apply button.
- Training courses appear in the date boxes on the calendar.
- Click the Reset button to clear the filter.


