Difference between revisions of "Area Monitor"
From MyFacilityFitPro_Wiki
(Created page with "Area Monitor. This is how you will create an existing record for use in a new special. == Special == {| class="wikitable" |- style="vertical-align:top;" |<big>'''<font siz...") |
|||
| (One intermediate revision by the same user not shown) | |||
| Line 1: | Line 1: | ||
| − | Area Monitor. This is how you will | + | Area Monitor. This is how you will check the statuses and assignments of Area Housekeeping activities, and assign housekeeping tasks. |
| − | + | ||
| − | == | + | == Area Monitor == |
{| class="wikitable" | {| class="wikitable" | ||
|- style="vertical-align:top;" | |- style="vertical-align:top;" | ||
|<big>'''<font size="5">1</font>'''</big> | |<big>'''<font size="5">1</font>'''</big> | ||
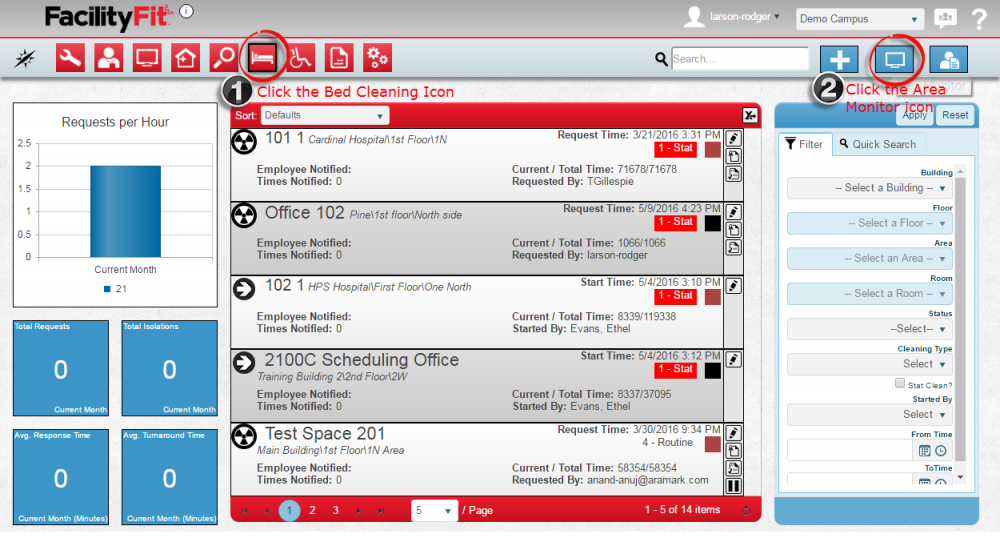
| − | |'''Option 1:'''Click the Large '''Bed Cleaning''' icon to open the Bed Cleaning window | + | |'''Option 1:''' |
| − | + | # Click the Large '''Bed Cleaning''' icon to open the Bed Cleaning window. | |
| + | # Press the '''Area Monitor''' button on the upper right. | ||
[[File:BedCleaning1AreaMonitor0.png|1000px]] | [[File:BedCleaning1AreaMonitor0.png|1000px]] | ||
| − | '''Option 2: Click the | + | |- style="vertical-align:top;" |
| + | |<big>'''<font size="5">2</font>'''</big> | ||
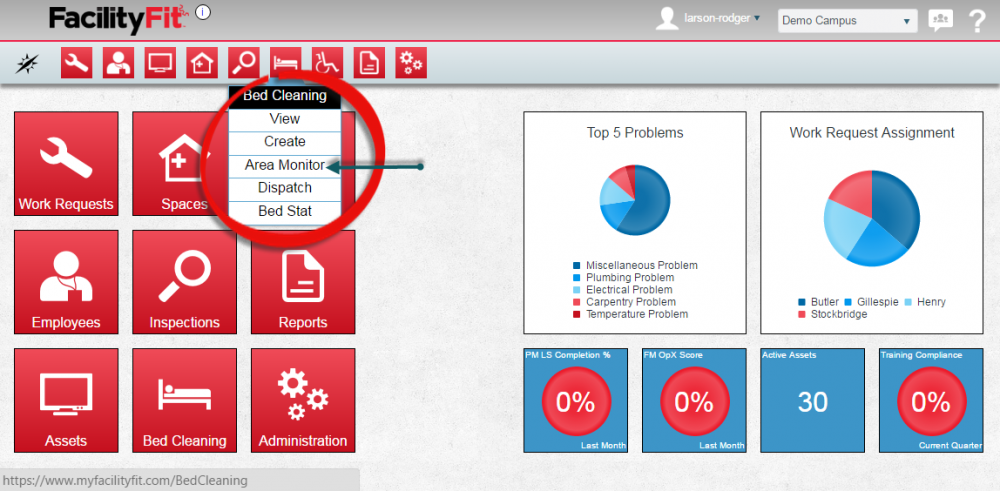
| + | |'''Option 2: ''' | ||
| + | # Click the '''Bed Cleaning '''dropdown | ||
| + | # Select '''Area Monitor. ''' | ||
[[File:BedCleaning1AreaMonitor.png|1000x1000px]] | [[File:BedCleaning1AreaMonitor.png|1000x1000px]] | ||
| + | |- style="vertical-align:top;" | ||
| + | |<big>'''<font size="5">3</font>'''</big> | ||
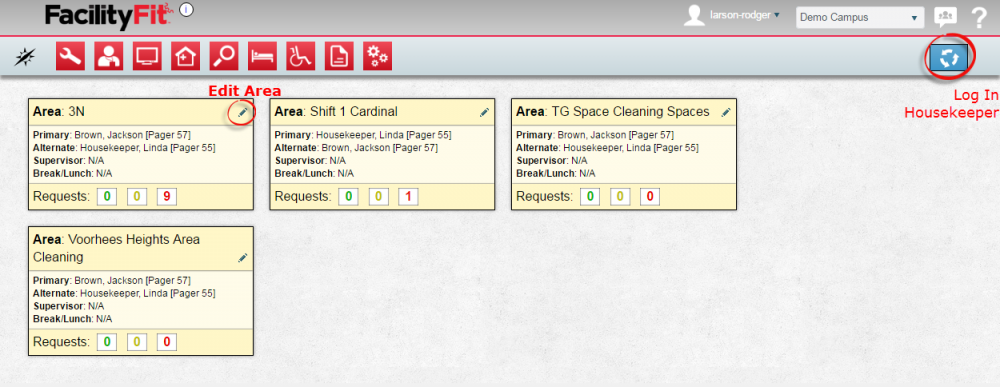
| + | |The Area Monitor Window will open. | ||
| + | |||
| + | [[File:BedCleaning1AreaMonitor00.png|1000x1000px]] | ||
|- style="vertical-align:top;" | |- style="vertical-align:top;" | ||
| − | |<big>'''<font size="5"> | + | |<big>'''<font size="5">4</font>'''</big> |
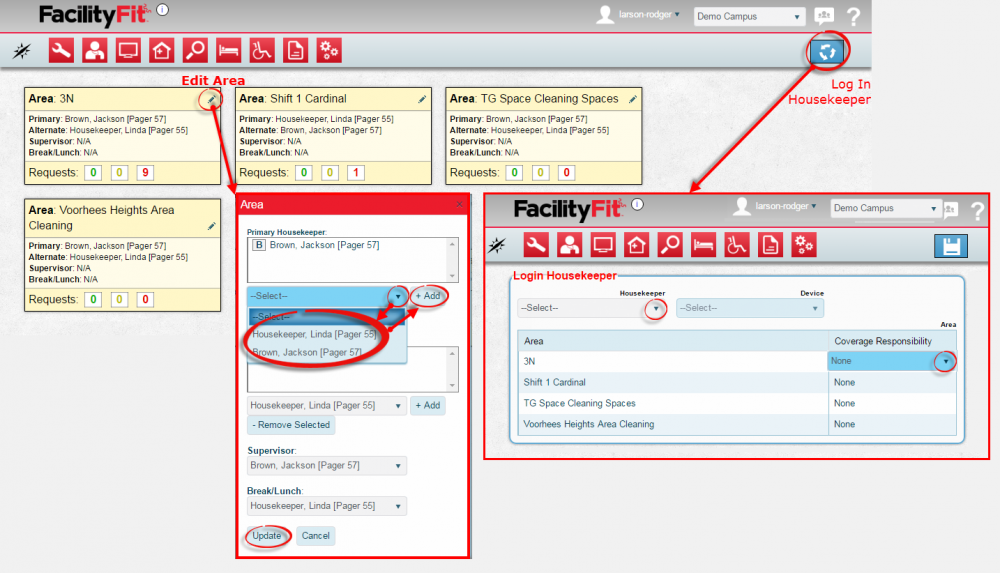
|Click into the '''Edit''' icon to open the Area window to assign primary and secondary housekeepers to the area. | |Click into the '''Edit''' icon to open the Area window to assign primary and secondary housekeepers to the area. | ||
The '''Log In Housekeeper''' icon on the upper right opens the Log In Housekeeper window. | The '''Log In Housekeeper''' icon on the upper right opens the Log In Housekeeper window. | ||
| Line 27: | Line 36: | ||
|- style="vertical-align:top;" | |- style="vertical-align:top;" | ||
| − | |<big>'''<font size="5"> | + | |<big>'''<font size="5">5</font>'''</big> |
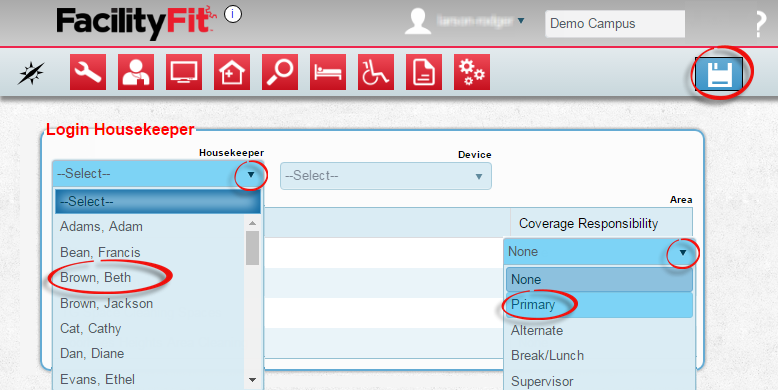
| − | |In the Log In Housekeeper window | + | |In the Log In Housekeeper window: |
| − | Click on the | + | # Click the '''Housekeeper''' dropdown to select employees and their roles in each assigned rooms. |
| − | Select a ''' | + | # Select a device from the '''Device''' dropdown after the employee is selected. |
| − | + | # Click on the space in the '''Coverage Responsibility''' column to make the dropdown arrow appear. Select a '''Role''' level for that area from the dropdown list. | |
| + | |||
| + | |||
| + | |||
| + | [[File:CleaningBed3AreaMonitor3LogInHousekeeper3.png|1000x1000px]] | ||
| − | |||
|- style="vertical-align:top;" | |- style="vertical-align:top;" | ||
| − | |<big>'''<font size="5"> | + | |<big>'''<font size="5">6</font>'''</big> |
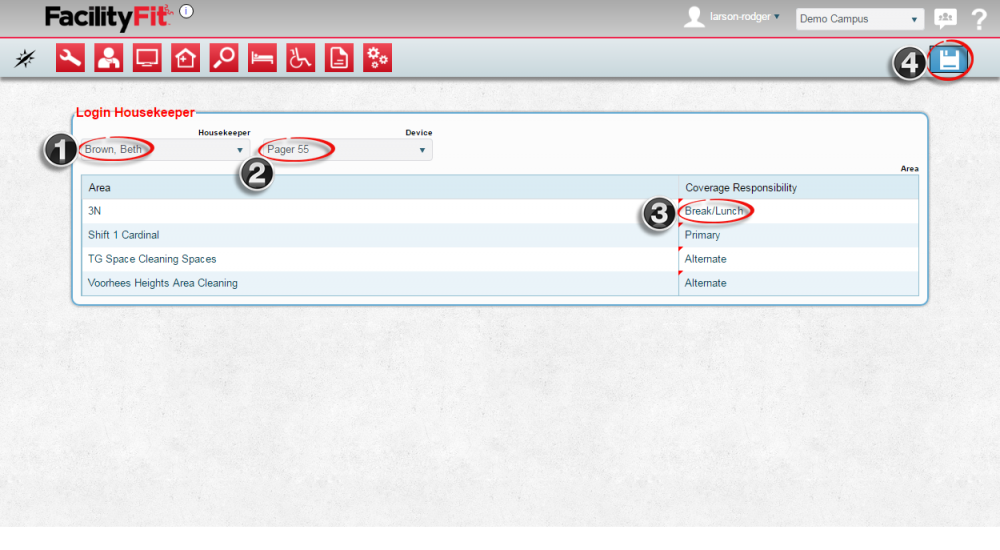
| − | | | + | |Check that the '''Housekeeper''', the '''Device''' (Example: Pager) and the '''Coverage Responsibility''' are correct. |
| + | [[File:CleaningBed3AreaMonitor3LogInHousekeeper2.png|1000x1000px]] | ||
| − | |||
Click the '''Save''' button [[File:Save.png|60px]] to complete the new request. | Click the '''Save''' button [[File:Save.png|60px]] to complete the new request. | ||
| Line 48: | Line 60: | ||
|- style="vertical-align:top;" | |- style="vertical-align:top;" | ||
| − | |<big>'''<font size="5"> | + | |<big>'''<font size="5">7</font>'''</big> |
|Error messages will advise you if something is wrong. If there are not any error messages the save is a success. | |Error messages will advise you if something is wrong. If there are not any error messages the save is a success. | ||
Latest revision as of 08:55, 10 May 2016
Area Monitor. This is how you will check the statuses and assignments of Area Housekeeping activities, and assign housekeeping tasks.
