Difference between revisions of "Add New Spaces"
From MyFacilityFitPro_Wiki
(Created page with "Add New Spaces == Add New Spaces == {| class="wikitable" |- style="vertical-align:top;" |<big>'''<font size="5">1</font>'''</big> |'''Option 1:''' # Click the large '''Spa...") |
|||
| Line 1: | Line 1: | ||
| − | |||
| − | |||
| − | |||
{| class="wikitable" | {| class="wikitable" | ||
| Line 7: | Line 4: | ||
|<big>'''<font size="5">1</font>'''</big> | |<big>'''<font size="5">1</font>'''</big> | ||
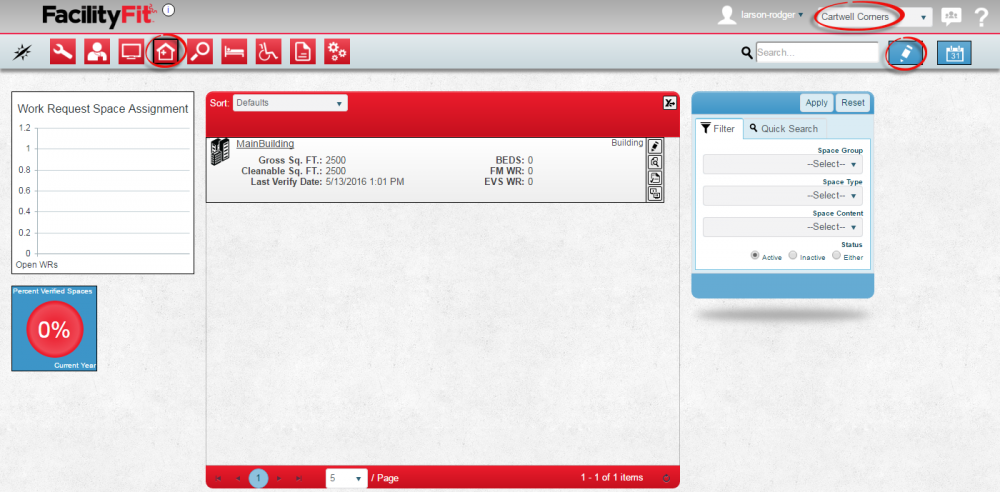
|'''Option 1:''' | |'''Option 1:''' | ||
| − | + | 1. Click the large '''Spaces''' icon to open the Spaces window. | |
| − | Select a '''Campus''' if you have that option. | + | 2. Select a '''Campus''' if you have that option. |
| − | + | 3. Press the '''Edit''' button on the upper right. | |
[[File:Spaces-Home.png|1000px]] | [[File:Spaces-Home.png|1000px]] | ||
| Line 15: | Line 12: | ||
|<big>'''<font size="5">2</font>'''</big> | |<big>'''<font size="5">2</font>'''</big> | ||
|'''Option 2: ''' | |'''Option 2: ''' | ||
| − | + | 1. Click the '''Spaces'''dropdown. | |
| − | + | 2. Select '''Create'''. | |
[[File:Spaces-Home.png|1000x1000px]] | [[File:Spaces-Home.png|1000x1000px]] | ||
| Line 22: | Line 19: | ||
|- style="vertical-align:top;" | |- style="vertical-align:top;" | ||
|<big>'''<font size="5">3</font>'''</big> | |<big>'''<font size="5">3</font>'''</big> | ||
| − | |The | + | |The '''Create''' window will open. Sections available are: |
| − | + | # Space Info | |
| + | # Space Attributes | ||
| + | # Comments | ||
| + | # Contents. | ||
[[File:Spaces-CreateHome.png|1000x1000px]] | [[File:Spaces-CreateHome.png|1000x1000px]] | ||
| + | |||
|- style="vertical-align:top;" | |- style="vertical-align:top;" | ||
|<big>'''<font size="5">4</font>'''</big> | |<big>'''<font size="5">4</font>'''</big> | ||
| − | | | + | |Current spaces that already exist are in the section on the left. |
| − | + | [[File:Spaces-AddFloor1.png|1000px]] | |
| − | + | ||
| − | + | ||
| − | [[File: | + | |
| + | |- style="vertical-align:top;" | ||
| + | |<big>'''<font size="5">6</font>'''</big> | ||
| + | |See the the 7 action buttons in the space window. | ||
| + | [[Image:Save.png]] The '''Save''' button. | ||
| + | [[Image:MassUpdate.png]] The Update Child Spaces button. | ||
| + | [[Image:CloneSpaceButton.png]] The Clone Spaces button. | ||
| + | [[Image:OrganizeSpaceButton.png]] - The Organize Space button. | ||
| + | [[Image:AddNewChildButton.png]] - The Add New Child button. | ||
| + | [[Image:Delete.png]] - The Delete button. | ||
| + | [[Image:PrintButton.png]] - The Print button. | ||
| + | |} | ||
| + | {| class="wikitable" | ||
| + | ==='''Add New Space'''=== | ||
|- style="vertical-align:top;" | |- style="vertical-align:top;" | ||
|<big>'''<font size="5">5</font>'''</big> | |<big>'''<font size="5">5</font>'''</big> | ||
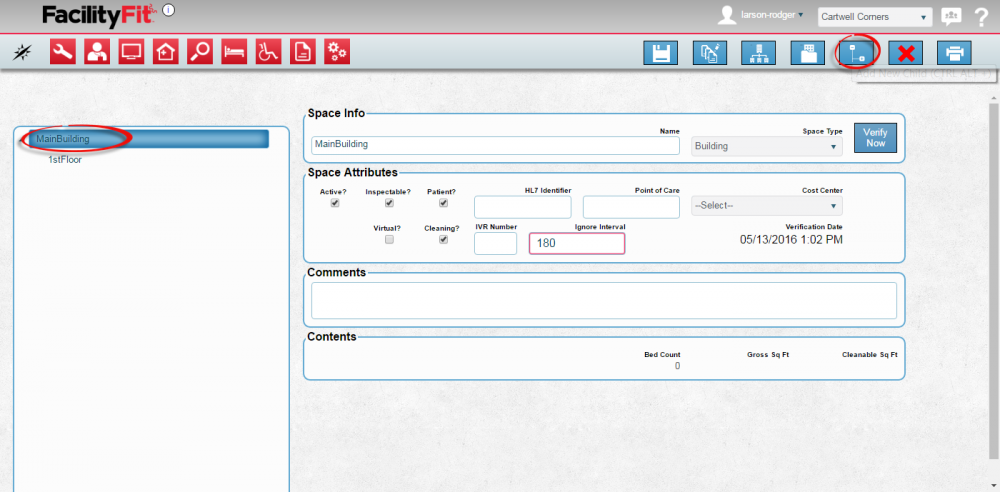
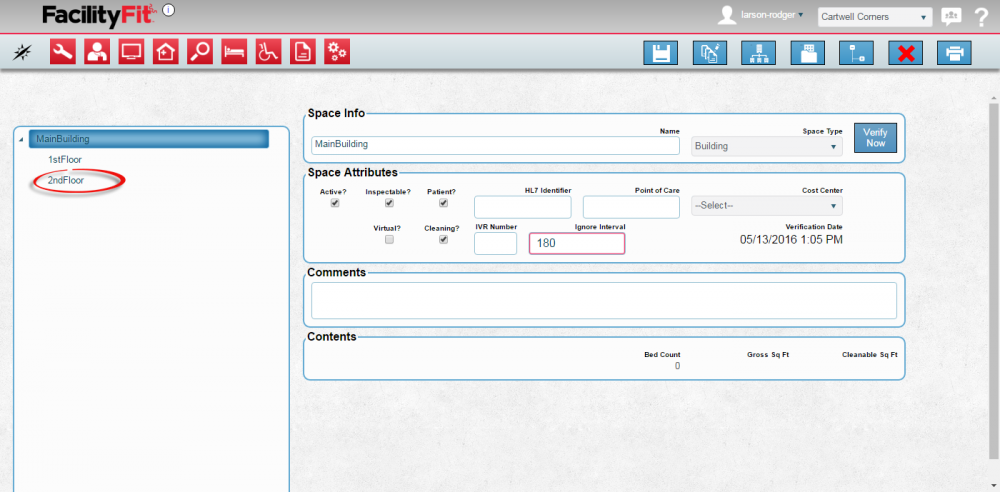
| − | |In the | + | |If the Building exists, you can add Floors, Areas and Rooms. |
| − | # Click the ''' | + | Start by adding a New Floor. |
| − | # Select | + | In the Left Pane: |
| − | # | + | # Click the arrow next to '''MainBuilding''' to show the current spaces in the Main Building. |
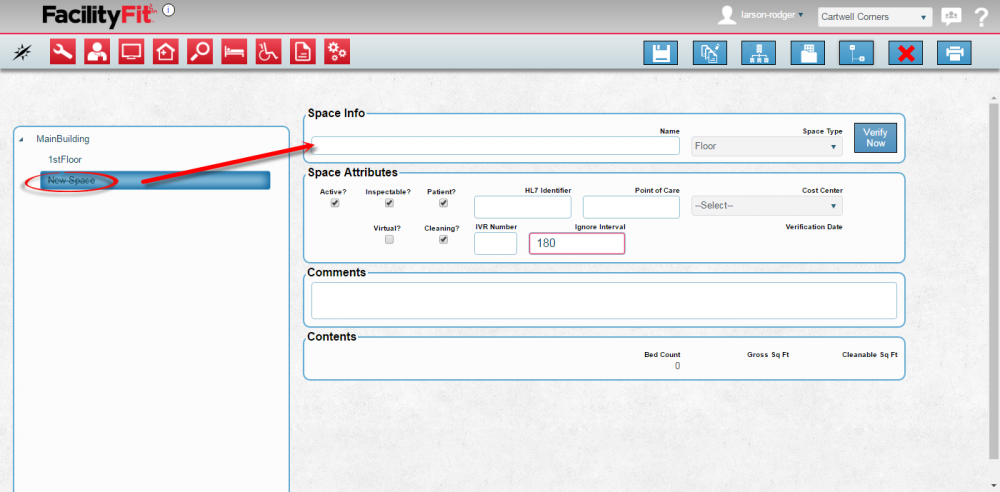
| + | # Select the space to be added to (main Building). Select the '''Add New Child''' button. [[Image:AddNewChildButton.png]] | ||
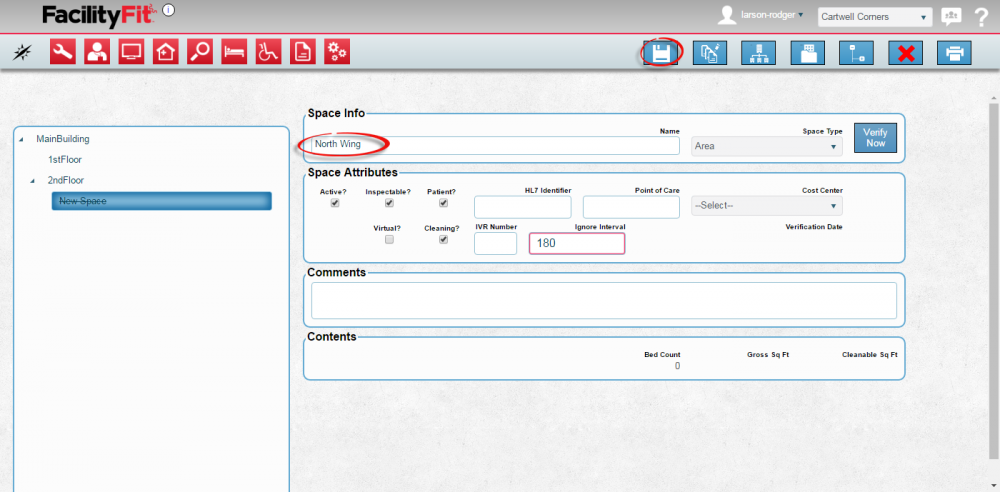
| + | # A Temporary placeholder will appear under the space selected (main Building). Type detail info and press '''Save''' button to save the new space. | ||
| + | [[File:Spaces-AddFloor2.png|1000px]] | ||
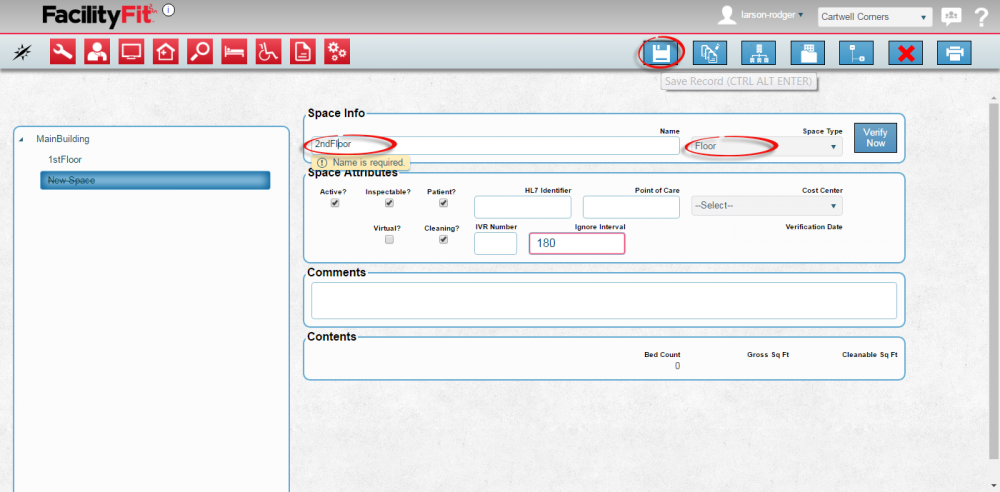
| + | # Enter a name in to the Space Info Name field. Space Type will normally default to the correct type of space for under the space selected (See Example below). | ||
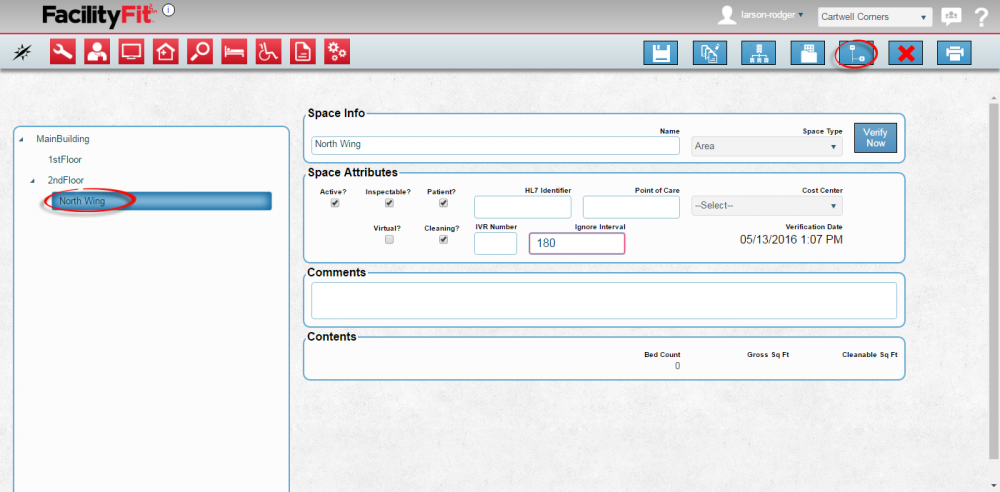
| − | + | [[File:Spaces-AddFloor3.png|1000px]] | |
| + | # Press the '''Save''' button to complete the add. | ||
| + | '''Space Type Examples:''' | ||
| + | # If a '''Building''' is selected and the '''Add New Child''' button is pressed, the new space type will default to '''Floor'''. | ||
| + | # If a '''Floor''' is selected and the '''Add New Child''' button is pressed, the new space type will be an '''Area'''. | ||
| + | # If an '''Area''' is selected and the '''Add New Child''' button is selected, the new space type will be a '''Room'''. | ||
| − | |||
| + | [[File:Spaces-AddFloor4.png|1000x1000px]] | ||
| + | |} | ||
| + | ===Add New Area=== | ||
| + | {| class="wikitable" | ||
| + | |- style="vertical-align:top;" | ||
| + | |<big>'''<font size="5">1</font>'''</big> | ||
| + | |Once a floor is available, the next steps is to add an '''Area'''. The floors of a building can be split up into areas. Waiting areas, Patient wings, Office areas will eventually contain rooms. | ||
| + | # Enter an '''Area''' name in to the Space Info Name field. Space Type will normally default to the correct type of space for under the space selected (See Example below). | ||
| + | [[File:Spaces-AddArea2.png|1000x1000px]] | ||
|- style="vertical-align:top;" | |- style="vertical-align:top;" | ||
| − | |<big>'''<font size="5"> | + | |<big>'''<font size="5">2</font>'''</big> |
| − | | | + | |Click the '''Save''' button [[File:Save.png|60px]] to complete the new request. |
| − | [[File: | + | |} |
| + | ===Add New Room=== | ||
| + | {| class="wikitable" | ||
| + | |- style="vertical-align:top;" | ||
| + | |<big>'''<font size="5">1</font>'''</big> | ||
| + | |||
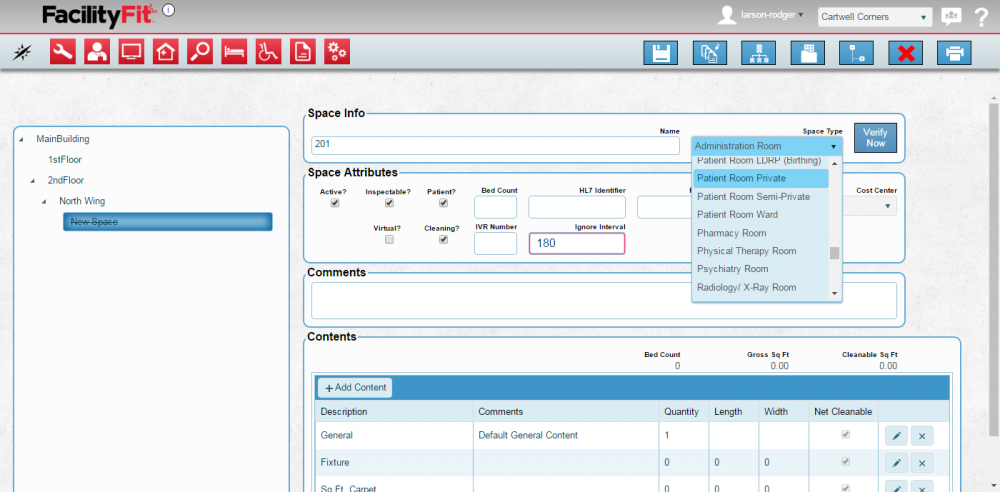
| + | |Once and area is available then rooms can be added. To add a room, select the '''Add New Child''' button. | ||
| + | [[File:Spaces-AddRoom1.png|1000x1000px]] | ||
| + | |||
| + | |- style="vertical-align:top;" | ||
| + | |<big>'''<font size="5">2</font>'''</big> | ||
| + | |Room spaces need a space type to be selected, by selecting a template from the '''Space Type''' dropdown list. | ||
| + | [[File:Spaces-AddRoom2-ChooseTemplate.png|1000px]] | ||
| + | |||
| + | |- style="vertical-align:top;" | ||
| + | |<big>'''<font size="5">3</font>'''</big> | ||
| + | |||
| + | |Rooms have other requirements that other spaces don't have. Cleanable space | ||
| + | Room creations also include an additional information to fill out for '''Contents'''. | ||
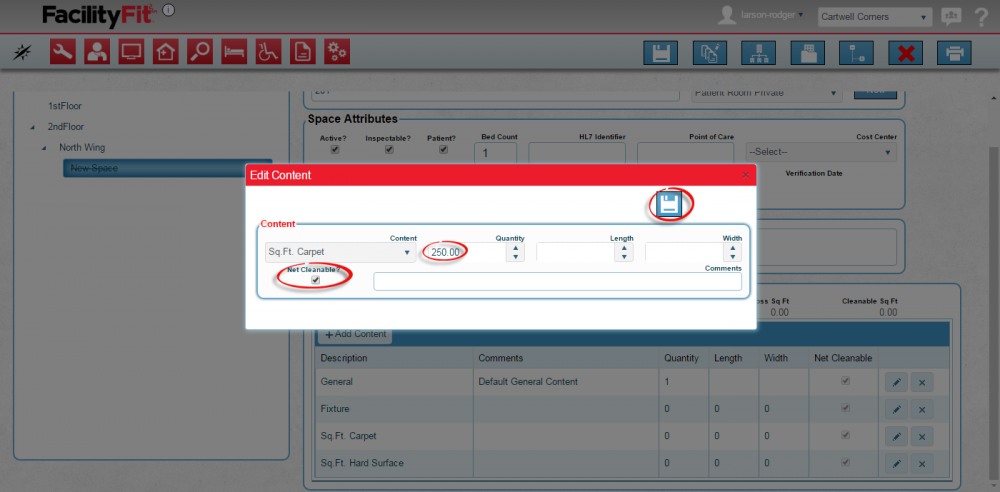
| + | Press the '''+ Add Contents''' button. The '''Add Content''' window opens. | ||
| + | Select content and press the save button. [[File:Save.png|60px]] | ||
| + | [[File:Spaces-AddRoom2-ChooseCarpetSpace.png|1000px]] | ||
| − | |||
| − | |||
|- style="vertical-align:top;" | |- style="vertical-align:top;" | ||
| − | |<big>'''<font size="5"> | + | |<big>'''<font size="5">4</font>'''</big> |
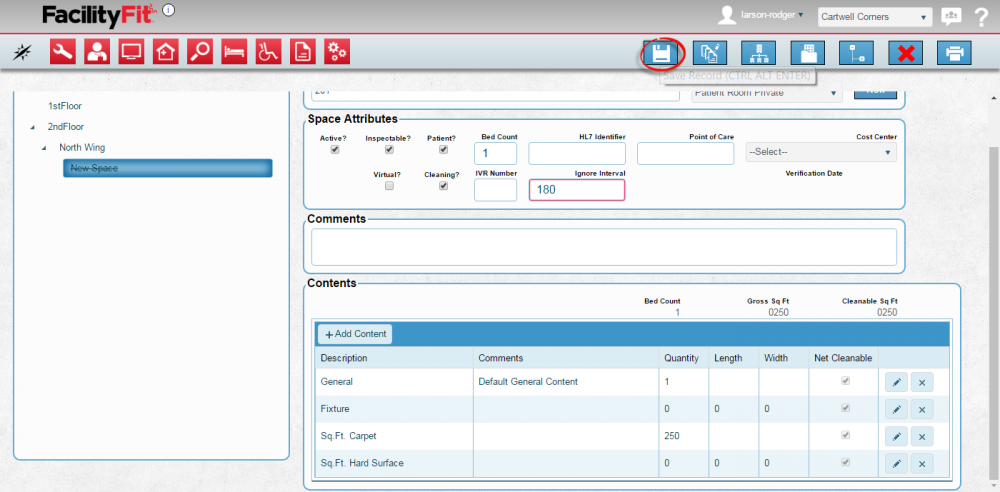
| − | |Error messages will advise you if something is wrong. If there are not any error messages the save is a success. | + | |The window will dissappear and the new data will be on the window underneath in the '''Contents''' section. |
| + | Press the '''Save''' button [[File:Save.png|60px]] to save the new room. Error messages will advise you if something is wrong. If there are not any error messages the save is a success. | ||
| + | [[File:Spaces-AddRoom2-Save.png|1000px]] | ||
| + | |} | ||
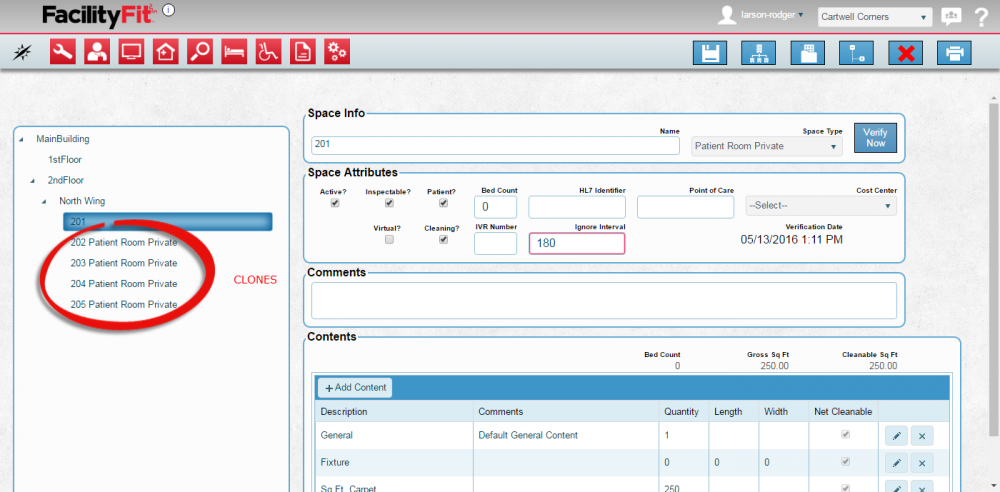
| + | ===Clone a Room=== | ||
| + | {| class="wikitable" | ||
| + | |- style="vertical-align:top;" | ||
| + | |<big>'''<font size="5">1</font>'''</big> | ||
| + | |||
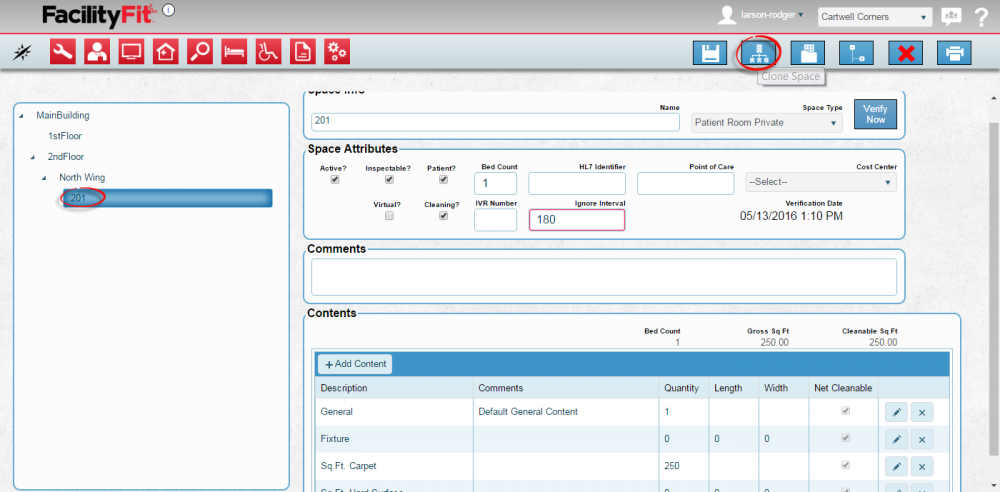
| + | |Once a room is created in an Area, the room can be cloned to create multiple room in that area. | ||
| + | Select the room and press the '''Clone Space''' button. | ||
| + | [[File:Spaces-CloneRoom1.png|1000px]] | ||
| + | |- style="vertical-align:top;" | ||
| + | |<big>'''<font size="5">2</font>'''</big> | ||
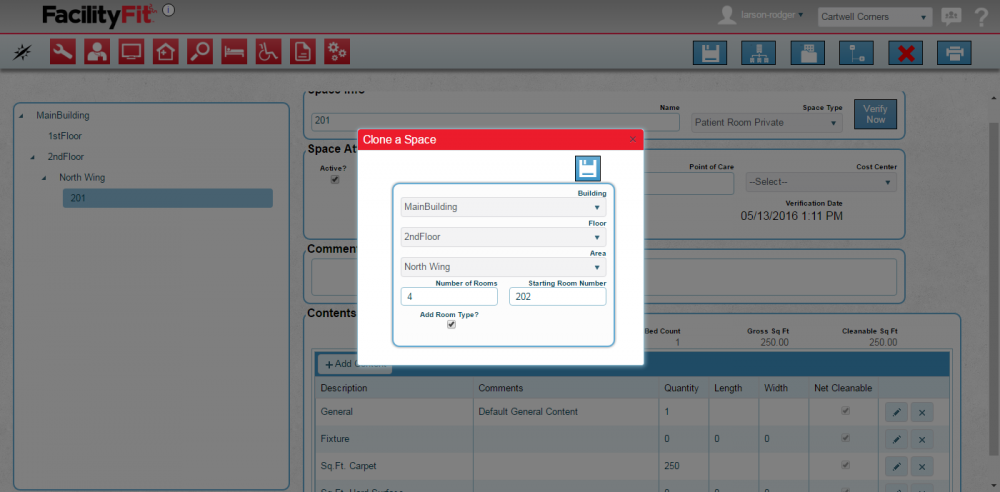
| + | |The '''Clone Space''' window will open. | ||
| + | See Fields for | ||
| + | # Building | ||
| + | # Floor | ||
| + | # Area | ||
| + | # Number of Rooms (Not including the original being cloned) | ||
| + | # Starting Room Number | ||
| + | [[File:Spaces-CloneRoom2.png|1000px]] | ||
| + | Press the '''Save''' button when the criteria of the clone is entered. [[File:Save.png|60px]] | ||
| + | |||
| + | |- style="vertical-align:top;" | ||
| + | |<big>'''<font size="5">3</font>'''</big> | ||
| + | |||
| + | |The results of the clone will appear in the area window. | ||
| + | [[File:Spaces-CloneRoom3After.png|1000px]] | ||
| + | [[File:Spaces-AddRoom1.png|1000x1000px]] | ||
|} | |} | ||
