Difference between revisions of "Add New Spaces"
From MyFacilityFitPro_Wiki
(Created page with "Add New Spaces == Add New Spaces == {| class="wikitable" |- style="vertical-align:top;" |<big>'''<font size="5">1</font>'''</big> |'''Option 1:''' # Click the large '''Spa...") |
(→Add New Building) |
||
| (7 intermediate revisions by the same user not shown) | |||
| Line 1: | Line 1: | ||
| − | + | == Adding and Cloning Spaces == | |
| − | == Add New | + | ==='''Open Add New Space Window'''=== |
{| class="wikitable" | {| class="wikitable" | ||
| Line 7: | Line 7: | ||
|<big>'''<font size="5">1</font>'''</big> | |<big>'''<font size="5">1</font>'''</big> | ||
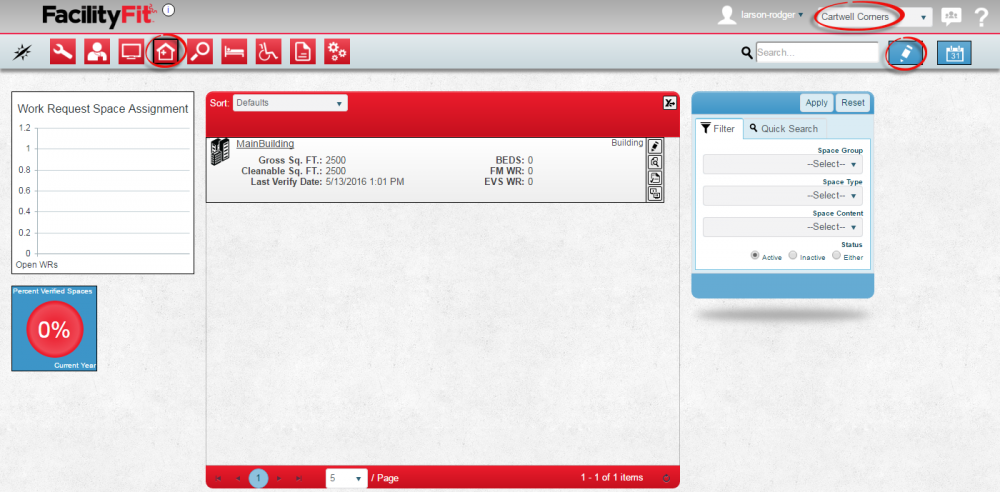
|'''Option 1:''' | |'''Option 1:''' | ||
| − | + | 1. Click the large '''Spaces''' icon to open the Spaces window. | |
| − | Select a '''Campus''' if you have that option. | + | |
| − | + | 2. Select a '''Campus''' if you have that option. | |
| + | |||
| + | 3. Press the '''Edit''' button on the upper right. | ||
[[File:Spaces-Home.png|1000px]] | [[File:Spaces-Home.png|1000px]] | ||
| Line 15: | Line 17: | ||
|<big>'''<font size="5">2</font>'''</big> | |<big>'''<font size="5">2</font>'''</big> | ||
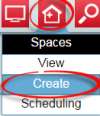
|'''Option 2: ''' | |'''Option 2: ''' | ||
| − | + | 1. Click the '''Spaces''' dropdown. | |
| − | + | ||
| − | [[File:Spaces- | + | 2. Select '''Create'''. |
| + | |||
| + | |||
| + | [[File:Spaces-DropdownCreate1.png|100px]] | ||
|- style="vertical-align:top;" | |- style="vertical-align:top;" | ||
|<big>'''<font size="5">3</font>'''</big> | |<big>'''<font size="5">3</font>'''</big> | ||
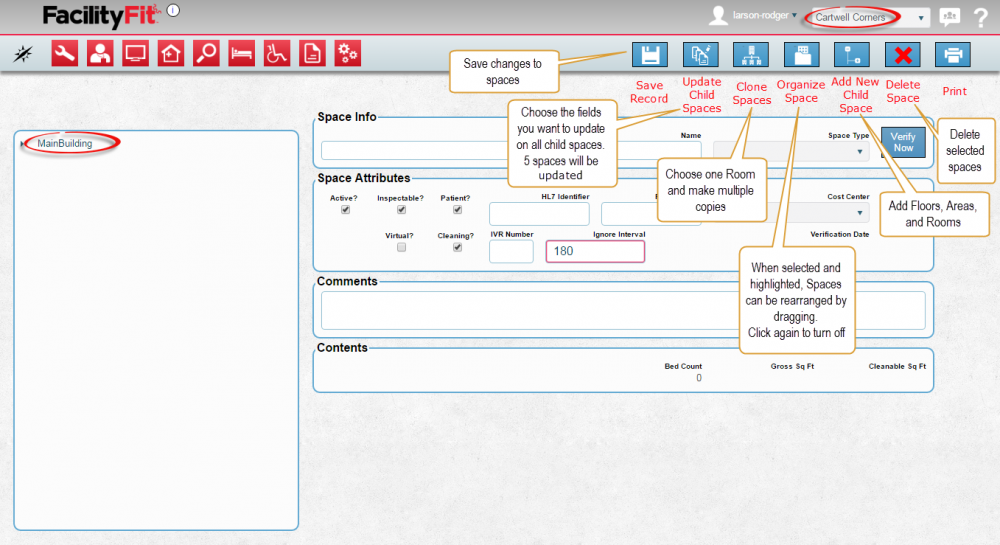
| − | |The | + | |The '''Create''' window will open. Sections available are: |
| − | + | # Space Info | |
| − | [[File:Spaces- | + | # Space Attributes |
| + | # Comments | ||
| + | # Contents. | ||
| + | [[File:Spaces-CreateHome1.png|1000x1000px]] | ||
|- style="vertical-align:top;" | |- style="vertical-align:top;" | ||
|<big>'''<font size="5">4</font>'''</big> | |<big>'''<font size="5">4</font>'''</big> | ||
| − | | | + | |See the 7 blue action buttons on the upper right of the add space window: |
| + | # [[Image:Save.png]] '''Save''' - To save your changes or sometimes to save your changes and move to the next screen. | ||
| + | # [[Image:MassUpdate.png]] '''Update Child Spaces''' - To update child spaces. | ||
| + | # [[Image:CloneSpaceButton.png]] '''Clone Spaces''' - Clone a space into another space or clone a room into multiples. | ||
| + | # [[Image:OrganizeSpaceButton.png]] '''Organize Space''' - When activated allows rooms to be reorganized using drag and drop. | ||
| + | # [[Image:AddNewChildButton.png]] '''Add New Child''' - used to add sub-spaces within a space (add Floors to Buildings, Areas to Floors etc.). | ||
| + | # [[Image:Delete.png]] '''Delete''' - To delete a selected space. | ||
| + | # [[Image:PrintButton.png]] '''Print''' - To open the print preview window. | ||
| − | + | |- style="vertical-align:top;" | |
| + | |<big>'''<font size="5">5</font>'''</big> | ||
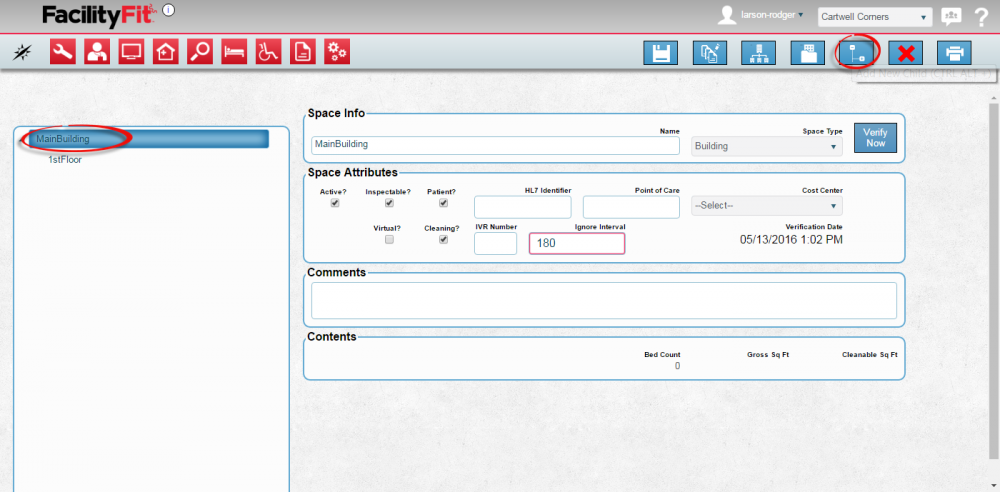
| + | |Current spaces that already exist are in the section on the left. | ||
| + | [[File:Spaces-AddFloor1.png|1000px]] | ||
| + | |} | ||
| − | [[File: | + | == Adding Spaces == |
| + | ==='''Add New Building'''=== | ||
| + | {| class="wikitable" border="1" | ||
| + | |- style="vertical-align:top;" | ||
| + | |<big>'''<font size="5">1</font>'''</big> | ||
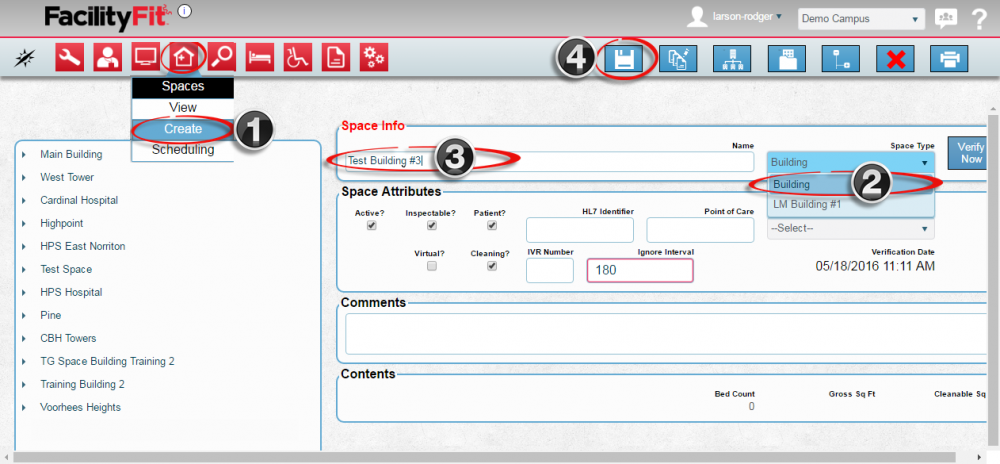
| + | |To add a new building select the spaces and select '''Create''' from the dropdown. | ||
| + | In the '''Identify''' section under the '''Space Type''' dropdown, select '''Building'''. | ||
| + | In the '''Name''' field type the name of the new building. | ||
| + | [[File:Spaces-NewBuilding0.png|1000px]] | ||
| + | |||
| + | |- style="vertical-align:top;" | ||
| + | |<big>'''<font size="5">2</font>'''</big> | ||
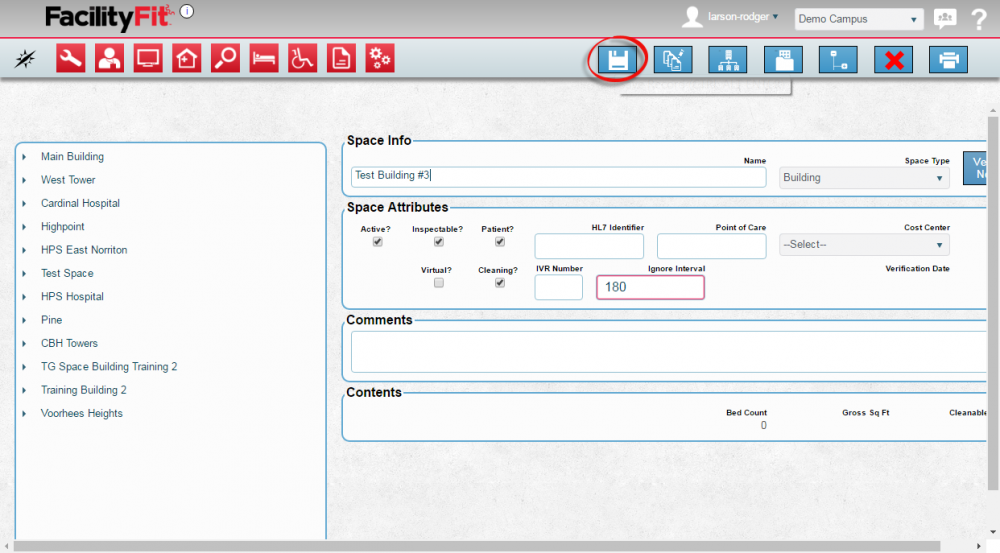
| + | |Press the '''Save''' button to complete the add. [[File:save.png]] | ||
| + | [[File:Spaces-AddBuilding2-save.png|1000px]] | ||
| + | |- style="vertical-align:top;" | ||
| + | |<big>'''<font size="5">3</font>'''</big> | ||
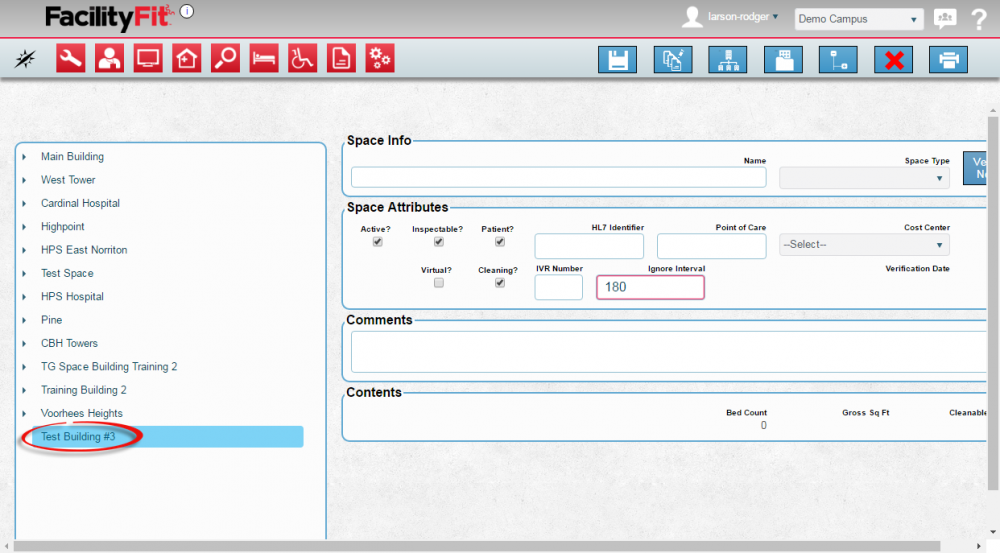
| + | |The new building will appear on the tree in the left window. | ||
| + | [[File:Spaces-AddBuilding3.png|1000px]] | ||
| + | |} | ||
| + | ==='''Add New Floor'''=== | ||
| + | {| class="wikitable" border="1" | ||
| + | |- style="vertical-align:top;" | ||
| + | |<big>'''<font size="5">1</font>'''</big> | ||
| + | |If a building exists, you can add or clone Floors, Areas and Rooms. | ||
| + | Start by adding a new floor. | ||
| + | In the left pane: | ||
| + | Click the tiny arrow next to '''MainBuilding''' to show the current spaces in the Main Building. The spaces "tree" will expand if there are spaces. | ||
| + | |||
| + | |- style="vertical-align:top;" | ||
| + | |<big>'''<font size="5">2</font>'''</big> | ||
| + | |Select the space to be added to (main Building). Select the '''Add New Child''' button. [[Image:AddNewChildButton.png]] | ||
| + | |||
| + | |- style="vertical-align:top;" | ||
| + | |<big>'''<font size="5">3</font>'''</big> | ||
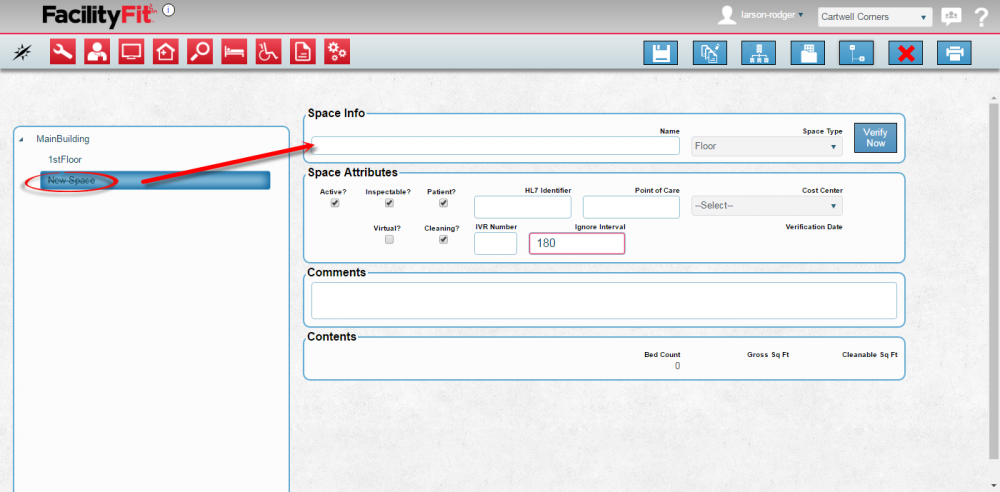
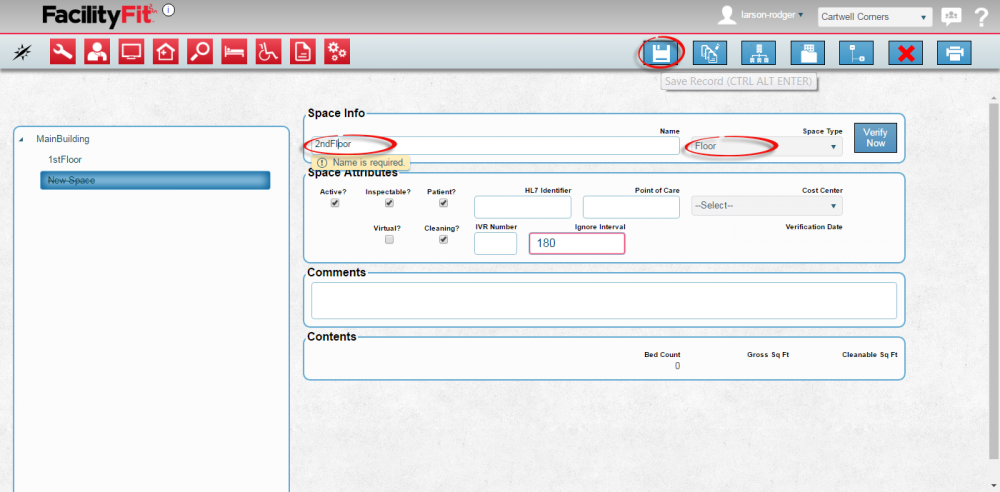
| + | |A Temporary placeholder will appear under the space selected (main Building). Type detail info and press '''Save''' button to save the new space. | ||
| + | [[File:Spaces-AddFloor2.png|1000px]] | ||
| + | |||
| + | |- style="vertical-align:top;" | ||
| + | |<big>'''<font size="5">4</font>'''</big> | ||
| + | |Enter a name in to the Space Info Name field. Space Type will normally default to the correct type of space for under the space selected (See Example below). | ||
| + | |||
| + | [[File:Spaces-AddFloor3.png|1000px]] | ||
|- style="vertical-align:top;" | |- style="vertical-align:top;" | ||
|<big>'''<font size="5">5</font>'''</big> | |<big>'''<font size="5">5</font>'''</big> | ||
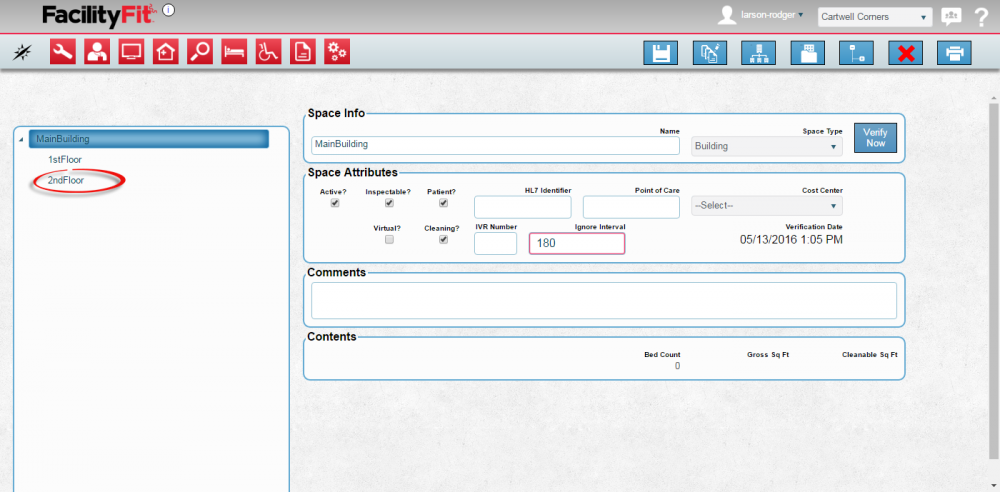
| − | | | + | |Press the '''Save''' button to complete the add. |
| − | + | ||
| − | + | ||
| − | + | ||
| − | + | '''Space Type Examples:''' | |
| + | # If a '''Building''' is selected and the '''Add New Child''' button is pressed, the new space type will default to '''Floor'''. | ||
| + | # If a '''Floor''' is selected and the '''Add New Child''' button is pressed, the new space type will be an '''Area'''. | ||
| + | # If an '''Area''' is selected and the '''Add New Child''' button is selected, the new space type will be a '''Room'''. | ||
| + | [[File:Spaces-AddFloor4.png|1000x1000px]] | ||
| + | |} | ||
| + | ===Add New Area=== | ||
| + | {| class="wikitable" | ||
| + | |- style="vertical-align:top;" | ||
| + | |<big>'''<font size="5">1</font>'''</big> | ||
| + | |Once a floor is available, the next steps is to add an '''Area'''. | ||
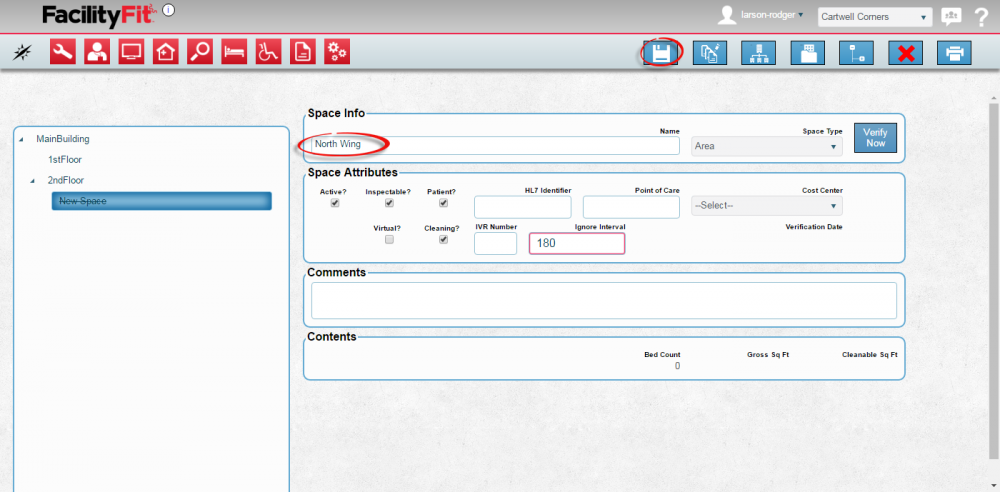
| + | To add an area, select floor and click the '''Add New Child''' button. | ||
| − | [[File: | + | The floors of a building can be split up into areas. Waiting areas, Patient wings, Office areas will eventually contain rooms. |
| + | # Enter an '''Area''' name in to the Space Info Name field. Space Type will normally default to the correct type of space for under the space selected (See Example below). | ||
| + | [[File:Spaces-AddArea2.png|1000x1000px]] | ||
| + | |- style="vertical-align:top;" | ||
| + | |<big>'''<font size="5">2</font>'''</big> | ||
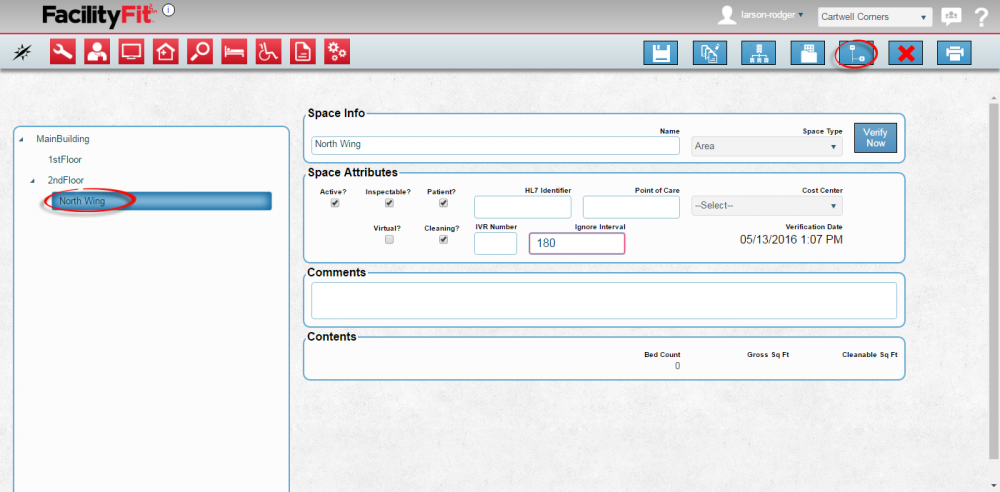
| + | |Click the '''Save''' button [[File:Save.png|60px]] to complete the new request. | ||
| + | |} | ||
| + | ===Add New Room=== | ||
| + | {| class="wikitable" | ||
| + | |- style="vertical-align:top;" | ||
| + | |<big>'''<font size="5">1</font>'''</big> | ||
| + | |||
| + | |Once and area is available then rooms can be added. To add a room, select the '''Add New Child''' button. | ||
| + | [[File:Spaces-AddRoom1.png|1000x1000px]] | ||
|- style="vertical-align:top;" | |- style="vertical-align:top;" | ||
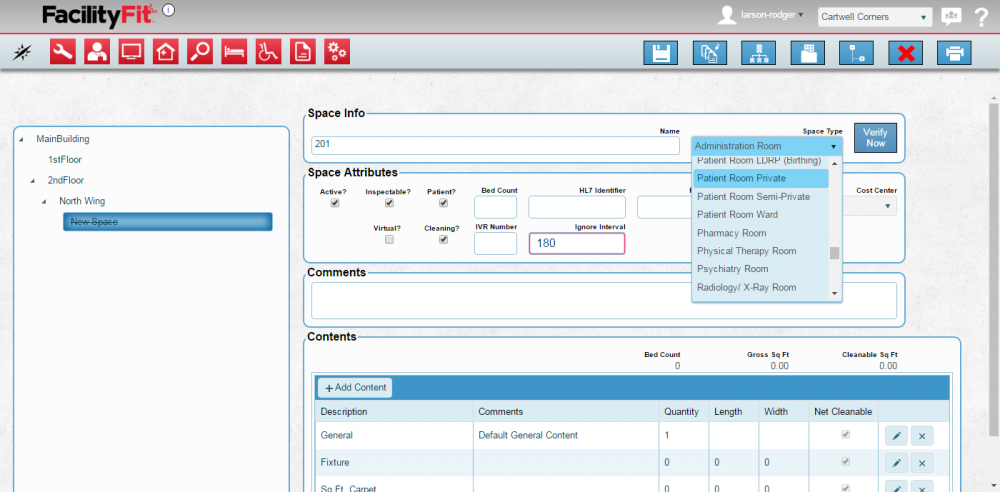
| − | |<big>'''<font size="5"> | + | |<big>'''<font size="5">2</font>'''</big> |
| − | | | + | |Room spaces need a space type to be selected, by selecting a template from the '''Space Type''' dropdown list. |
| − | [[File: | + | [[File:Spaces-AddRoom2-ChooseTemplate.png|1000px]] |
| + | |||
| + | |- style="vertical-align:top;" | ||
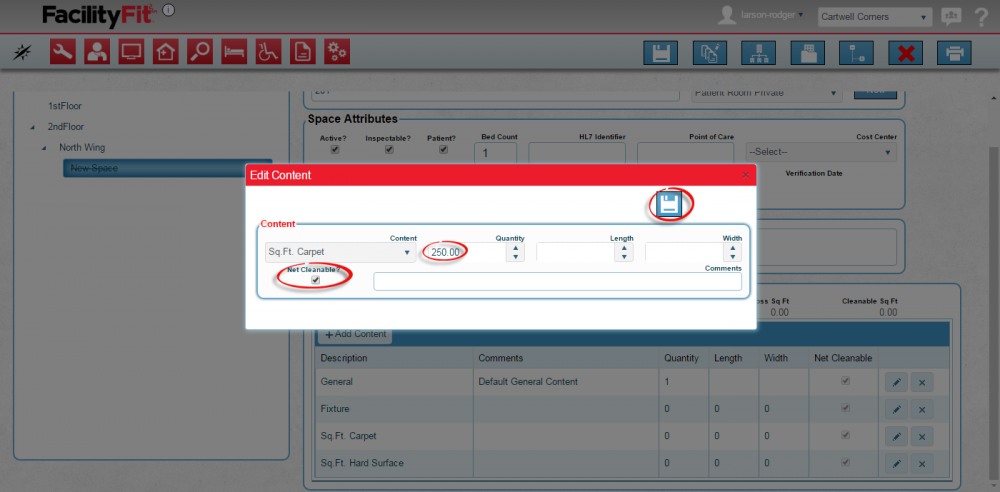
| + | |<big>'''<font size="5">3</font>'''</big> | ||
| + | |||
| + | |Rooms have other requirements that other spaces don't have. Cleanable space | ||
| + | Room creations also include an additional information to fill out for '''Contents'''. | ||
| + | Press the '''+ Add Contents''' button. The '''Add Content''' window opens. | ||
| + | Select content and press the save button. [[File:Save.png|60px]] | ||
| + | [[File:Spaces-AddRoom2-ChooseCarpetSpace.png|1000px]] | ||
| − | |||
| − | |||
| + | |- style="vertical-align:top;" | ||
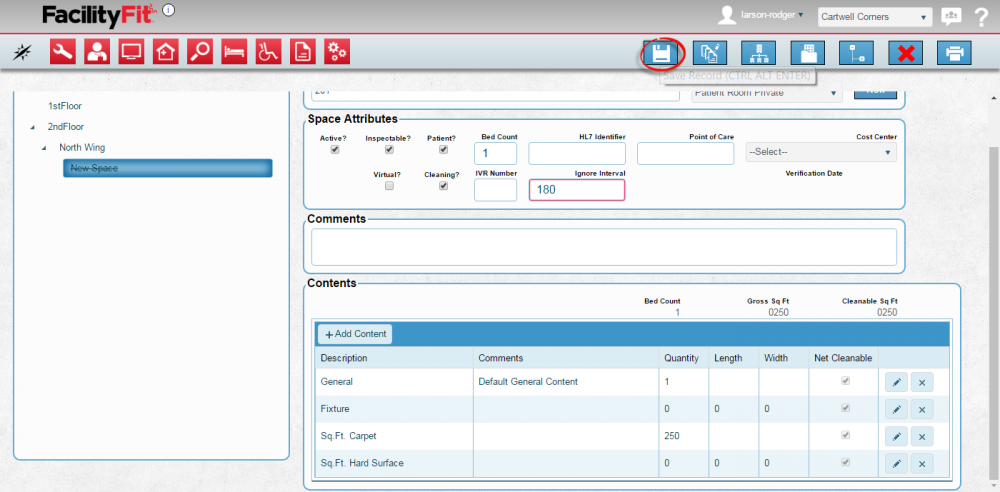
| + | |<big>'''<font size="5">4</font>'''</big> | ||
| + | |||
| + | |The window will disappear and the new data will be on the window underneath in the '''Contents''' section. | ||
| + | Press the '''Save''' button [[File:Save.png|60px]] to save the new room. | ||
| + | Error messages will advise you if something is wrong. If there are not any error messages the save is a success. | ||
| + | [[File:Spaces-AddRoom2-Save.png|1000px]] | ||
| + | |||
| + | |} | ||
| + | |||
| + | ==Cloning Spaces== | ||
| + | ===Clone a Room=== | ||
| + | {| class="wikitable" | ||
|- style="vertical-align:top;" | |- style="vertical-align:top;" | ||
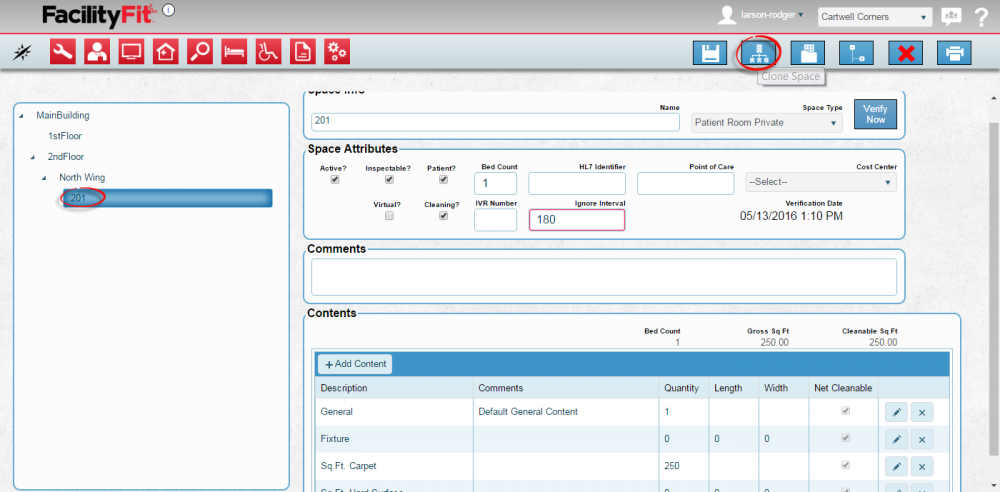
| − | |<big>'''<font size="5"> | + | |<big>'''<font size="5">1</font>'''</big> |
| − | | | + | |Once a room is created in an Area, the space can be cloned to create multiple rooms in a selected area. |
| + | Make sure all the space details, especially for rooms, are added before cloning to save lots of extra work changing each cloned space. | ||
| + | Select a room and press the '''Clone''' button. | ||
| + | [[File:Spaces-CloneRoom1.png|1000px]] | ||
| + | |- style="vertical-align:top;" | ||
| + | |<big>'''<font size="5">2</font>'''</big> | ||
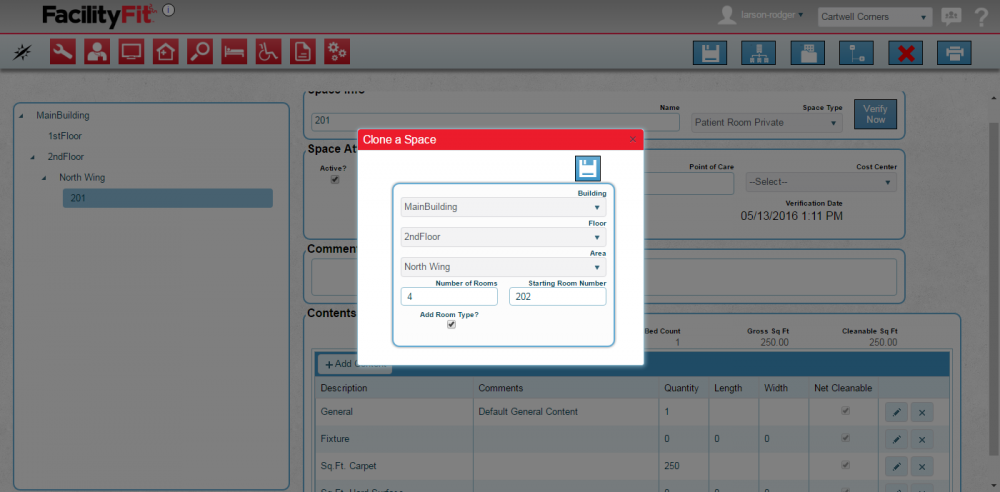
| + | |The '''Clone Space''' window will open. | ||
| + | See fields for: | ||
| + | # Building | ||
| + | # Floor | ||
| + | # Area | ||
| + | # Number of Rooms (Not including the original being cloned) | ||
| + | # Starting Room Number (if original room is 101 then the starting number can be 102) | ||
| + | [[File:Spaces-CloneRoom2.png|1000px]] | ||
| + | |||
| + | |- style="vertical-align:top;" | ||
| + | |<big>'''<font size="5">3</font>'''</big> | ||
| + | |||
| + | |Make sure the space details, especially for rooms, are added before cloning to save lots of extra work changing each cloned space. | ||
| + | Press the '''Save''' button when the criteria of the clone has been entered. [[File:Save.png|60px]] | ||
| + | |||
| + | |- style="vertical-align:top;" | ||
| + | |<big>'''<font size="5">4</font>'''</big> | ||
| + | |||
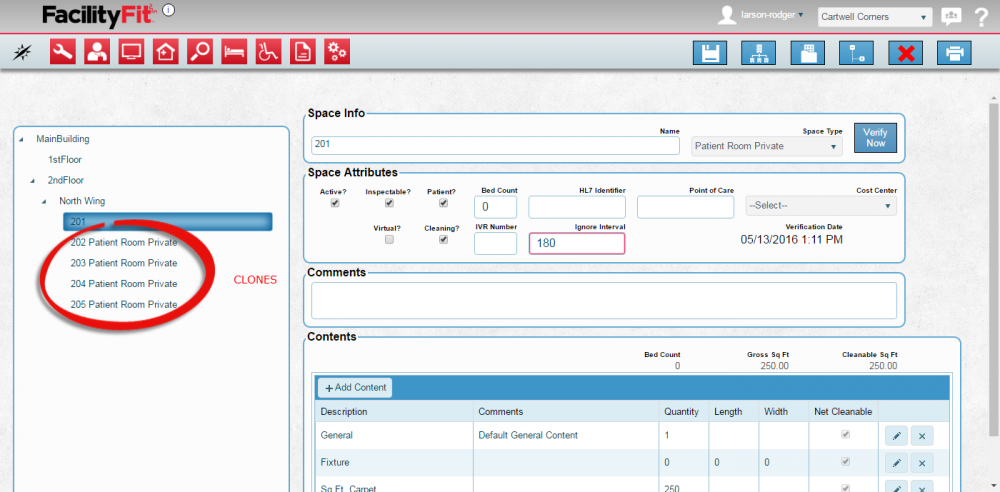
| + | |The results of the clone will appear in the area window. | ||
| + | |||
| + | [[File:Spaces-CloneRoom3After.png|1000px]] | ||
| + | |||
| + | |} | ||
| + | |||
| + | |||
| + | |||
| + | |||
| + | ===Clone an Area=== | ||
| + | {| class="wikitable" | ||
| + | |- style="vertical-align:top;" | ||
| + | |<big>'''<font size="5">1</font>'''</big> | ||
| + | |||
| + | |Once an Area is created on a floor and the rooms are created in an Area, the space can be cloned to create another floor with the same areas and rooms. | ||
| + | Select an '''Area''' and press the '''Clone''' button. | ||
| + | [[File:Spaces-CloneArea1.png|1000px]] | ||
| + | |||
| + | |- style="vertical-align:top;" | ||
| + | |<big>'''<font size="5">2</font>'''</big> | ||
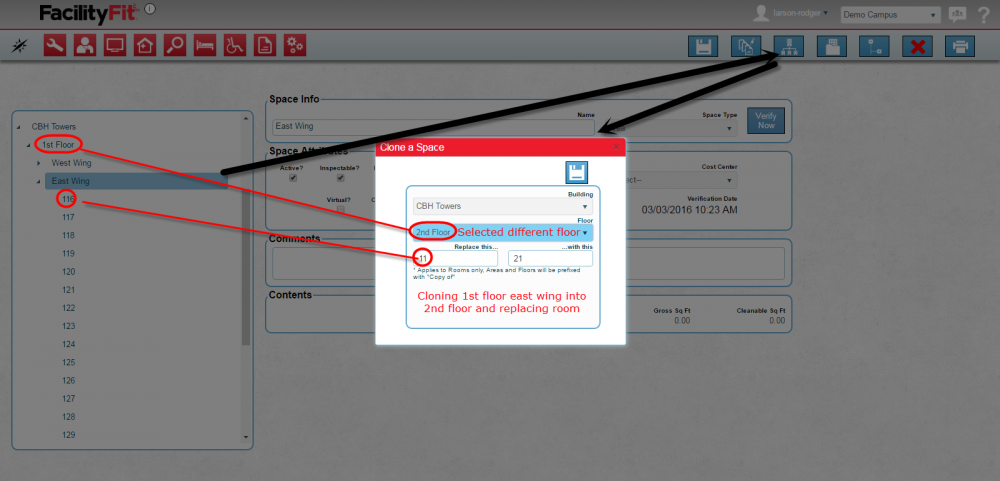
| + | |The '''Clone a Space''' window will open. | ||
| + | '''Note:''' The window is different than when cloning a room. | ||
| + | See fields for: | ||
| + | # Building | ||
| + | # Floor | ||
| + | # Replace this... | ||
| + | # With this... | ||
| + | |||
| + | |||
| + | Different target locations are available to be selected. Choose to place the cloned area on another floor or create another wing on the current floor. Replace fields are to save time renaming rooms after the cloning. Areas must always be renamed to remove the "Copy of" label. | ||
| + | |||
| + | |||
| + | |- style="vertical-align:top;" | ||
| + | |<big>'''<font size="5">3</font>'''</big> | ||
| + | |Make sure the space details, especially for rooms, are added before cloning to save lots of extra work changing each cloned space. | ||
| + | Press the '''Save''' button when the criteria of the clone has been entered. [[File:Save.png|60px]] | ||
| + | |||
| + | |- style="vertical-align:top;" | ||
| + | |<big>'''<font size="5">4</font>'''</big> | ||
| + | |||
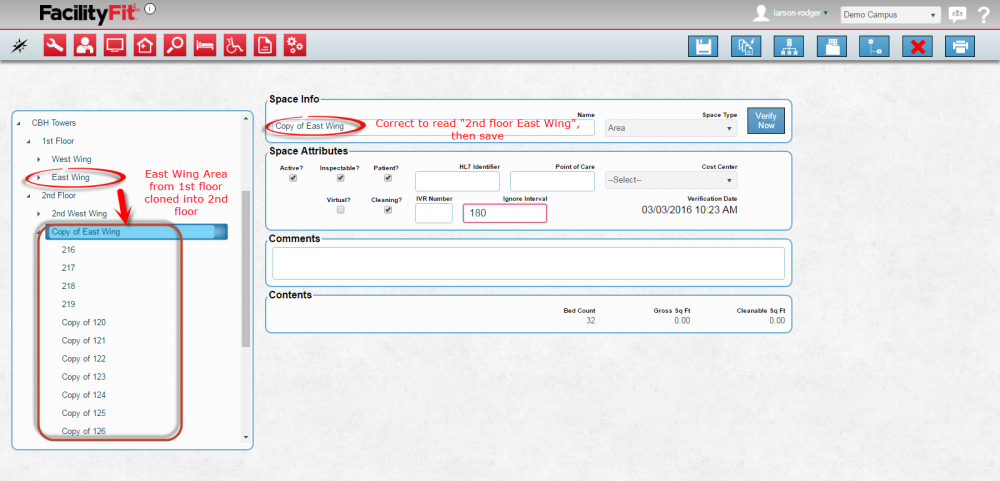
| + | |The results of the clone will appear in the area window. | ||
| + | |||
| + | [[File:Spaces-CloneArea2.png|1000px]] | ||
| + | |||
| + | |} | ||
| + | |||
| + | |||
| + | |||
| + | |||
| + | |||
| + | |||
| + | |||
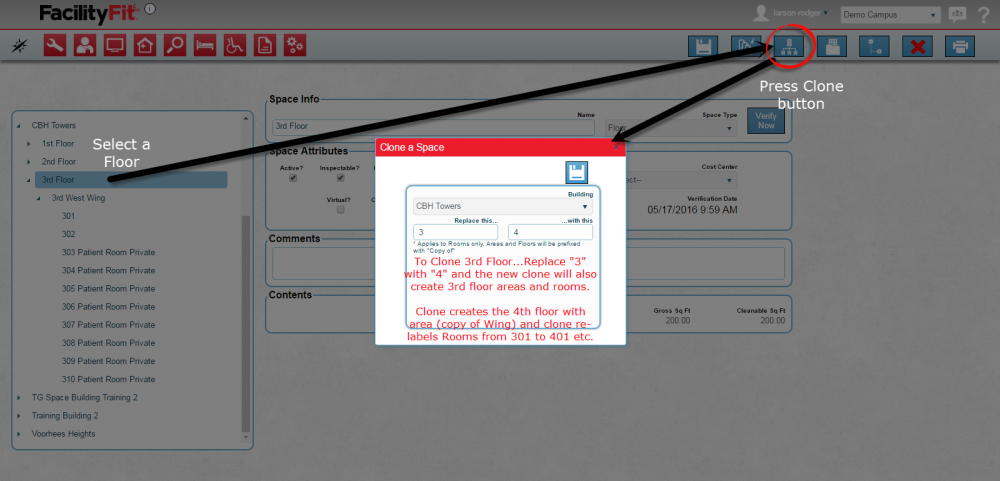
| + | ===Clone a Floor=== | ||
| + | {| class="wikitable" | ||
| + | |- style="vertical-align:top;" | ||
| + | |<big>'''<font size="5">1</font>'''</big> | ||
| + | |||
| + | |Once an Area is created on a floor and the rooms are created in an Area, the space can be cloned to create another floor with the same areas and rooms. | ||
| + | Select a '''Floor''' and press the '''Clone''' button. | ||
| + | [[File:Spaces-CloneFloor1.png|1000px]] | ||
| + | |||
| + | |- style="vertical-align:top;" | ||
| + | |<big>'''<font size="5">2</font>'''</big> | ||
| + | |The '''Clone a Space''' window will open. | ||
| + | '''Note:''' The window is different than when cloning a room. | ||
| + | See fields for: | ||
| + | # Building | ||
| + | # Replace this... | ||
| + | # With this... | ||
| + | |||
| + | Different target locations are available to be selected. Create the cloned area as another floor. Replace fields are to save time renaming rooms after the cloning. Floors and Areas must always be renamed to remove the "Copy of" label. | ||
| + | |||
| + | Make sure the space details, especially for rooms, are added before cloning to save lots of extra work changing each cloned space. | ||
| + | |||
| + | |- style="vertical-align:top;" | ||
| + | |<big>'''<font size="5">3</font>'''</big> | ||
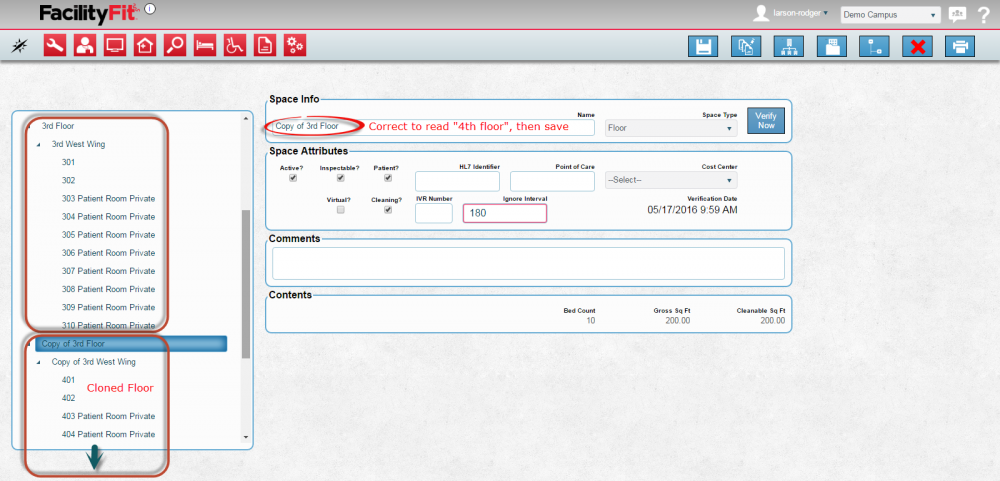
| + | |Press the '''Save''' button when the criteria of the clone has been entered. [[File:Save.png|60px]] | ||
| + | |||
| + | |- style="vertical-align:top;" | ||
| + | |<big>'''<font size="5">4</font>'''</big> | ||
| + | |||
| + | |The results of the clone will appear in the area window. | ||
| + | [[File:Spaces-CloneFloor2.png|1000px]] | ||
|} | |} | ||
Latest revision as of 11:53, 18 May 2016
Contents
Adding and Cloning Spaces
Open Add New Space Window
Adding Spaces
Add New Building
Add New Floor
Add New Area
Add New Room
Cloning Spaces
Clone a Room
Clone an Area
