Difference between revisions of "Update Status of Work Request"
From MyFacilityFitPro_Wiki
(→Update Status of Work Request) |
(→Update Status of Work Request) (Tag: VisualEditor) |
||
| Line 3: | Line 3: | ||
|- style="vertical-align:top;" | |- style="vertical-align:top;" | ||
|<big>'''<font size="5">1</font>'''</big> | |<big>'''<font size="5">1</font>'''</big> | ||
| − | | Click ''' | + | | Click '''Work Request''' icon to open the work request window. |
| + | [[File:MenuWorkRequests.png|left|thumb|120x120px]]<br> | ||
|- style="vertical-align:top;" | |- style="vertical-align:top;" | ||
|<big>'''<font size="5">2</font>'''</big> | |<big>'''<font size="5">2</font>'''</big> | ||
| − | | | + | |Find the Work Request to be edited by using search or by filtering the Work Requests. |
|- style="vertical-align:top;" | |- style="vertical-align:top;" | ||
|<big>'''<font size="5">3</font>'''</big> | |<big>'''<font size="5">3</font>'''</big> | ||
| − | | | + | |Select the '''Update Status''' icon from the right end of the work request row. |
| + | |||
| + | [[File:WorkRequestUpdateStatusButton.png|left|thumb|711x711px]] | ||
|- style="vertical-align:top;" | |- style="vertical-align:top;" | ||
|<big>'''<font size="5">4</font>'''</big> | |<big>'''<font size="5">4</font>'''</big> | ||
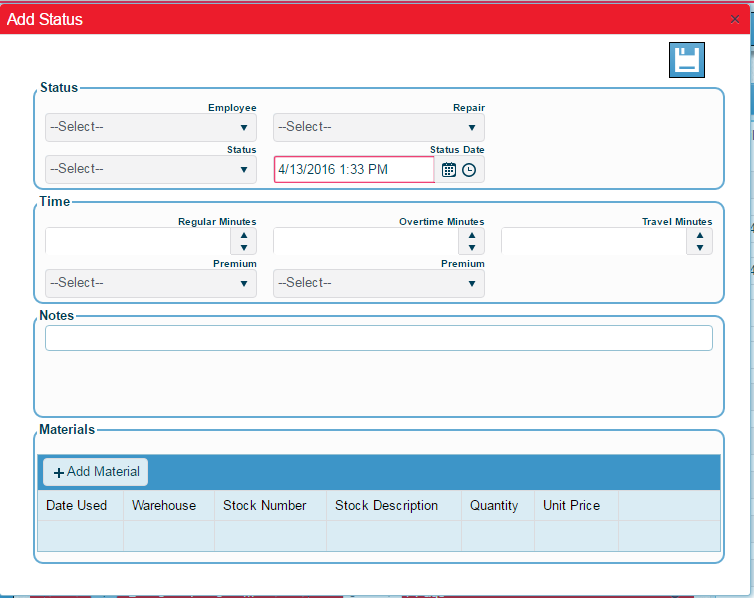
| − | | | + | |The Add Status window will open. See sections for '''Status, Time, Notes''' and '''Materials'''. |
| + | |||
| + | [[File:AddStatusWindow.png|left|thumb|754x754px]] | ||
| + | |||
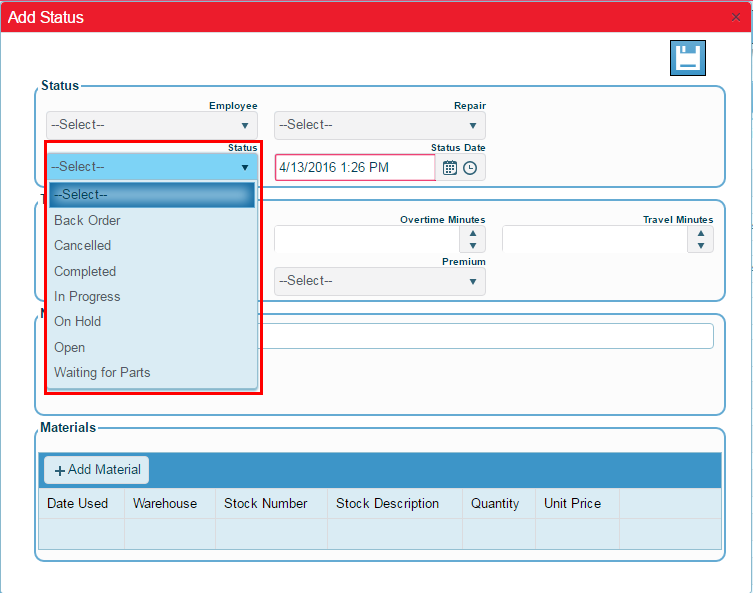
| + | Select the status dropdown in the status section and choose the updated status. | ||
| + | |||
| + | [[File:AddStatusDropdown.png|left|thumb|753x753px]] | ||
|- style="vertical-align:top;" | |- style="vertical-align:top;" | ||
|<big>'''<font size="5">5</font>'''</big> | |<big>'''<font size="5">5</font>'''</big> | ||
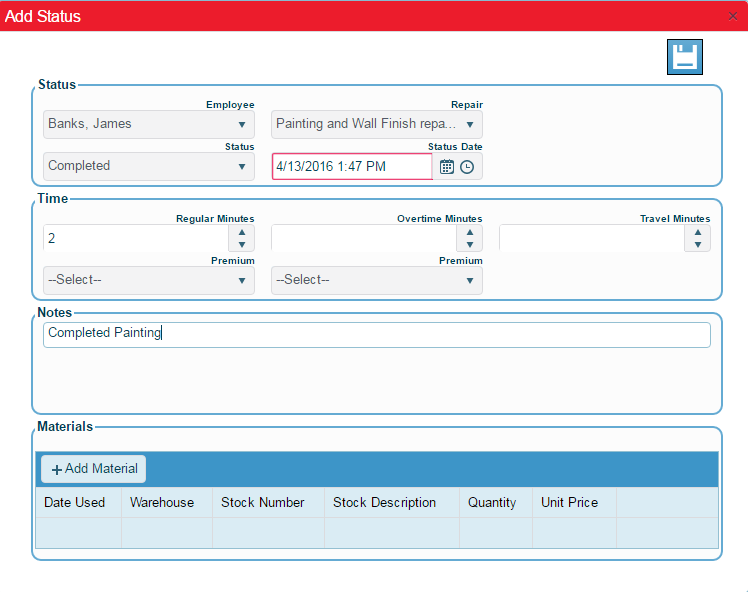
| − | | | + | |Select any other changes necessary, like assigning an employee or selecting a repair type. |
| + | |||
| + | [[File:CompletedPainting.png|left|thumb|748x748px]] | ||
|- style="vertical-align:top;" | |- style="vertical-align:top;" | ||
|<big>'''<font size="5">6</font>'''</big> | |<big>'''<font size="5">6</font>'''</big> | ||
| − | | | + | |Press the '''Save''' icon in the upper right. |
| + | |||
| + | [[File:AddStatusCompletedSaved.png|left|thumb|733x733px]] | ||
|- style="vertical-align:top;" | |- style="vertical-align:top;" | ||
|<big>'''<font size="5">7</font>'''</big> | |<big>'''<font size="5">7</font>'''</big> | ||
| − | | | + | |To confirm the update, find the Work Request using the search field or by filtering, then check that the status is now updated. |
| − | + | ||
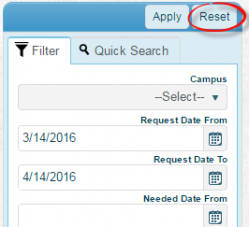
| − | + | To find the Work Request by search, be sure to reset the filter first. | |
| − | + | ||
| − | + | [[File:ResetFilterCrop.png|left|thumb|249x249px]] | |
| − | | | + | |
| − | | | + | Use the search field to find the Work Request number. See the updated status.[[File:WorkRequestEditCompleted.png|left|thumb|964x964px]] |
| − | | | + | |
| − | + | ||
| − | | | + | |
| − | | | + | |
| − | | | + | |
|} | |} | ||
Revision as of 11:29, 13 April 2016
Update Status of Work Request
| 1 | Click Work Request icon to open the work request window.
|
| 2 | Find the Work Request to be edited by using search or by filtering the Work Requests. |
| 3 | Select the Update Status icon from the right end of the work request row. |
| 4 | The Add Status window will open. See sections for Status, Time, Notes and Materials.
Select the status dropdown in the status section and choose the updated status. |
| 5 | Select any other changes necessary, like assigning an employee or selecting a repair type. |
| 6 | Press the Save icon in the upper right. |
| 7 | To confirm the update, find the Work Request using the search field or by filtering, then check that the status is now updated.
To find the Work Request by search, be sure to reset the filter first. Use the search field to find the Work Request number. See the updated status. |


