From MyFacilityFitPro_Wiki
|
|
| (One intermediate revision by the same user not shown) |
| Line 1: |
Line 1: |
| | + | Shows a print preview of the work order that can then be printed and handed to an employee |
| | + | |
| | == Print Preview a Work Request == | | == Print Preview a Work Request == |
| | {| class="wikitable" | | {| class="wikitable" |
| Line 18: |
Line 20: |
| | |<big>'''<font size="5">4</font>'''</big> | | |<big>'''<font size="5">4</font>'''</big> |
| | |Select your next action from the menu. | | |Select your next action from the menu. |
| − | * To '''Preview''' the work request, select number '''9'''. | + | * To '''Preview''' the work request, select number '''9'''. Skip to step 5. |
| − | * To '''Export''' the document, select number '''10'''. | + | * To '''Export''' the document, select number '''10'''. Skip to step 6. |
| − | * To '''Print''' on paper, select number '''11'''. | + | * To '''Print''' on paper, select number '''11'''. Skip to step 7. |
| | | | |
| | [[File:ReportMenu.png|753x753px]] | | [[File:ReportMenu.png|753x753px]] |
Latest revision as of 11:05, 15 April 2016
Shows a print preview of the work order that can then be printed and handed to an employee
Print Preview a Work Request
| 1
|
Click Work Requests to open the Work Request window.

|
| 2
|
Search for and select a Work Request to preview.
Click on the Print Preview icon on the right of the row.

|
| 3
|
The Work Request window for that number will open. You will see the Report Navigation Menu Bar as shown.

|
| 4
|
Select your next action from the menu.
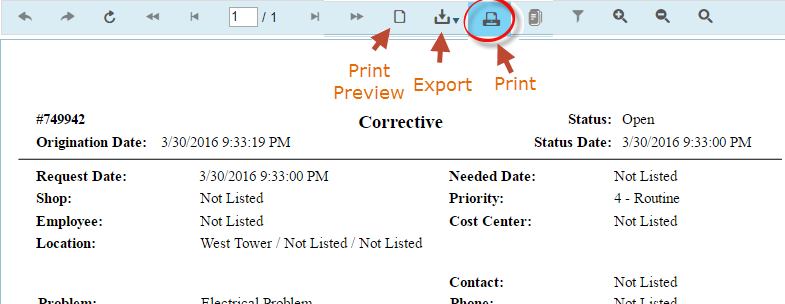
- To Preview the work request, select number 9. Skip to step 5.
- To Export the document, select number 10. Skip to step 6.
- To Print on paper, select number 11. Skip to step 7.

- Navigate Backward - Go to the previous page in the report.
- Navigate Forward - Go the next page in the report.
- Refresh - Reload the report to include latest information since the last time it was generated.
- First Page - Go to the first page in the report.
- Previous Page - Go to the page that comes before the page that is currently displayed.
- Page Counter - Displays the page you are on and the total number of pages in the report. You can enter a page number in the field and hit enter to go to that page.
- Next Page - Go to the next page.
- Last Page - Go to the last page in the report.
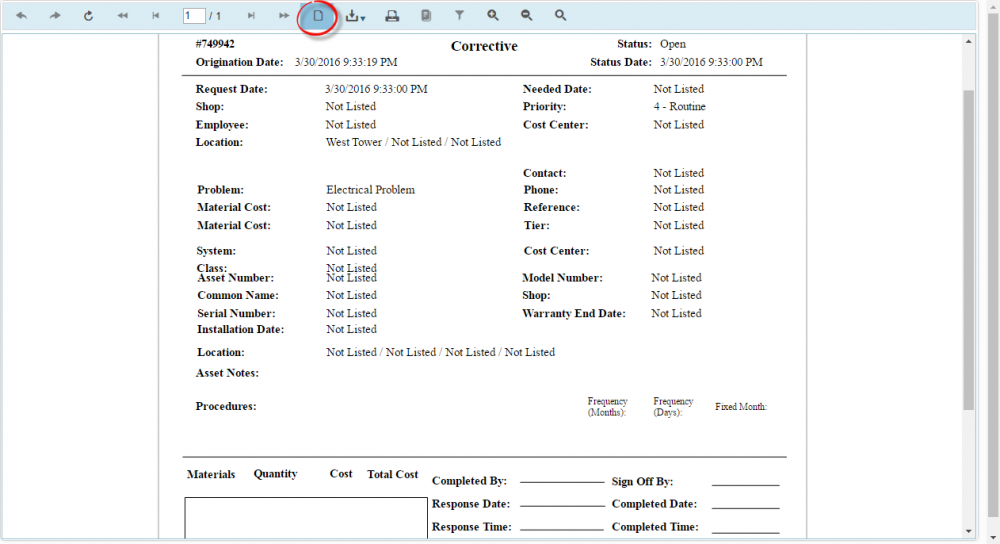
- Toggle Print Preview - View the report how it would look if it was printed.
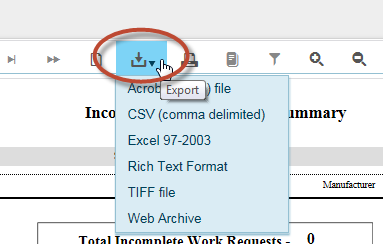
- Export - Drop-down list showing available options for exporting the report.
- Print - Send the report to the printer of your choice.
- Toggle Document Map - Not functional.
- Toggle Parameters Area - Not functional.
- Zoom In - Magnify the view of the report page that is displayed.
- Zoom Out - Shrink the view of the report page that is displayed.
- Toggle Full Page/Page Width - On/Off switch to fit the full page of the report to display on your screen.
|
| 5
|
Print Preview: Selecting the Print Preview icon from the report navigation menu bar will show the print preview window.

|
| 6
|
Export the Work Order: Selecting the Export icon from the menu will open the dropdown selection.
Choose the preferred export method from the dropdown.

The exported file will go to your downloads folder.

|
| 7
|
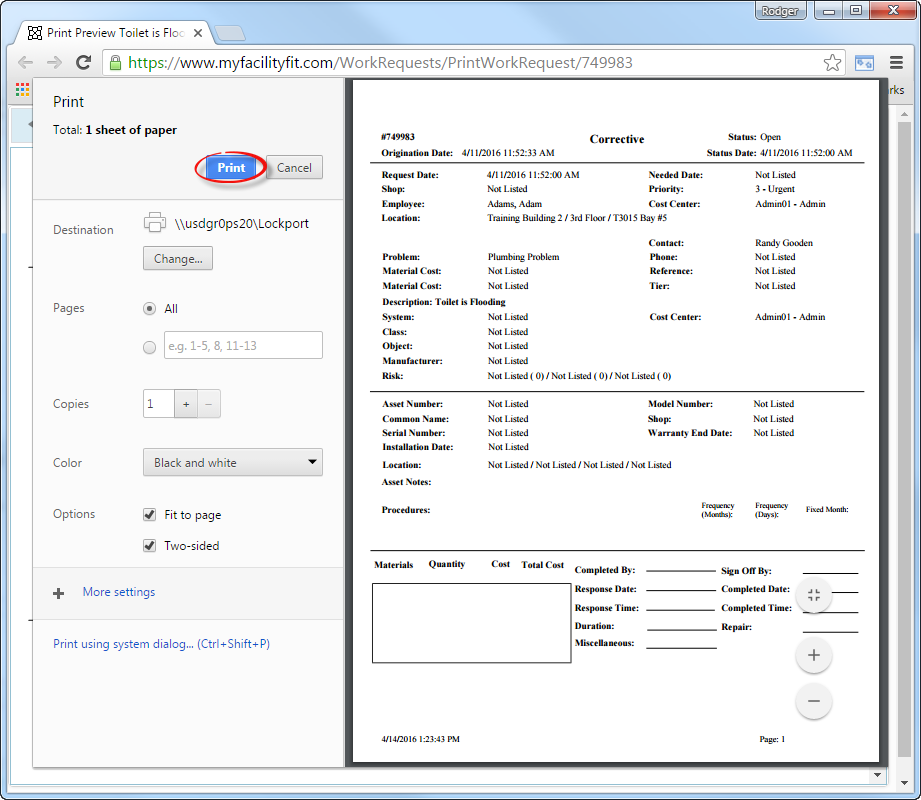
Print on Paper: To print the report on paper, select the Print icon from the menu. The Print Window will open.

Choose a destination printer, if not already setup, then click on the Print button. The Print Preview window will disappear. Check your printer for the pages.
|


