Difference between revisions of "Dispatch"
From MyFacilityFitPro_Wiki
| Line 17: | Line 17: | ||
|- | |- | ||
|<big>'''<font size="5">3</font>'''</big> | |<big>'''<font size="5">3</font>'''</big> | ||
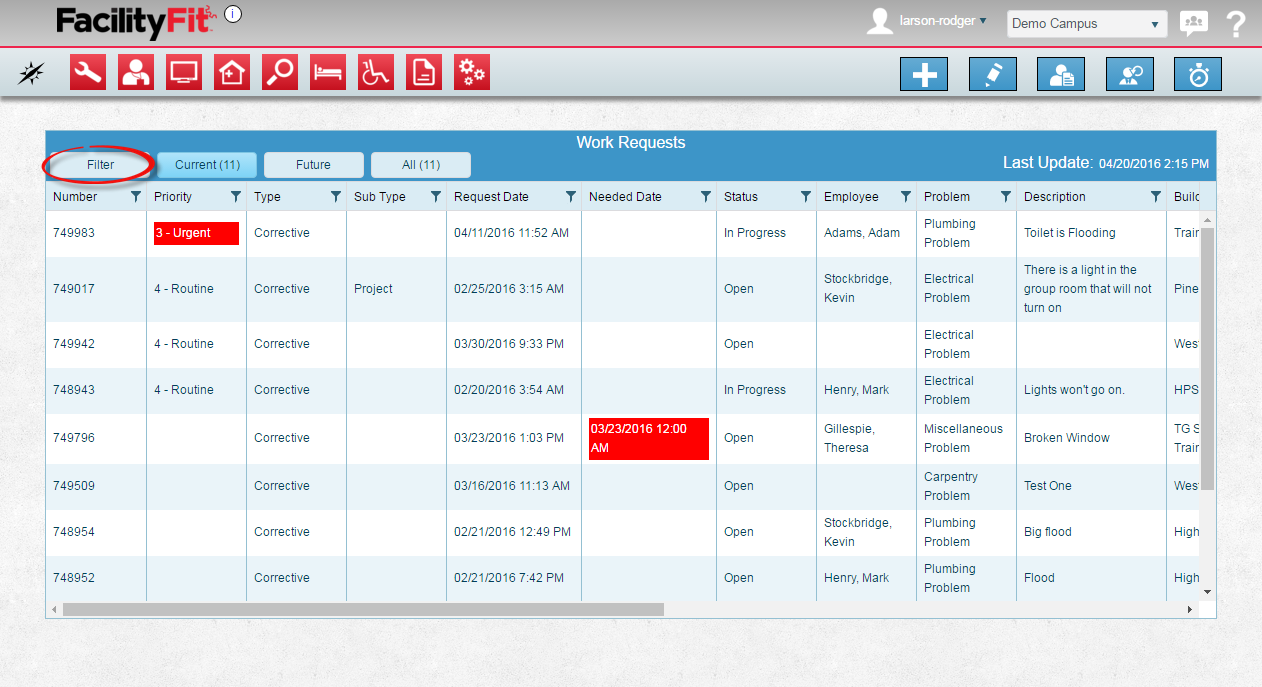
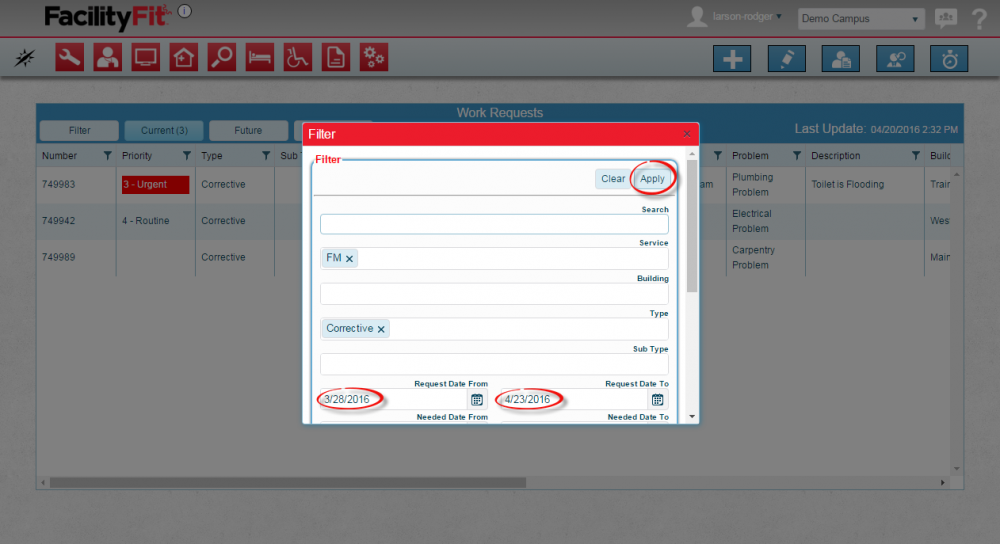
| − | |The filter will allow you to limit the results so you can find the Work Request to be dispatched. Apply the filter parameters to limit the results. | + | |The filter will allow you to limit the results so you can find the Work Request to be dispatched. Apply the filter parameters to limit the results. Press the '''Apply''' button to see the results. |
| + | |||
[[File:Work Request DispatchFilter2.png|1000x1000px]] | [[File:Work Request DispatchFilter2.png|1000x1000px]] | ||
|- | |- | ||
|<big>'''<font size="5">4</font>'''</big> | |<big>'''<font size="5">4</font>'''</big> | ||
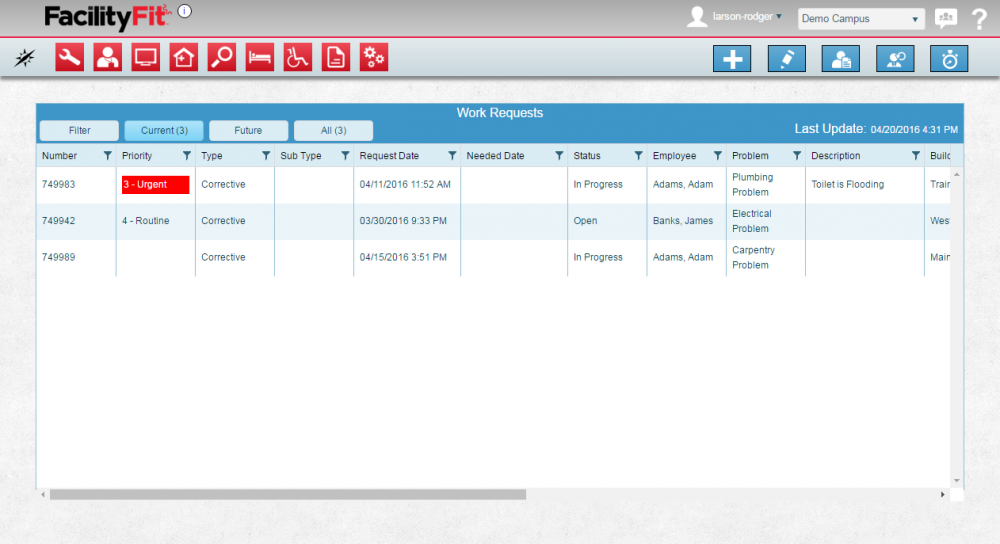
| − | | | + | |Check that the Work Request details have been filtered and a smaller selection of Work Requests are listed. |
| + | |||
[[File:Work Request DispatchFilter2Results.png|1000x1000px]] | [[File:Work Request DispatchFilter2Results.png|1000x1000px]] | ||
|- | |- | ||
|<big>'''<font size="5">5</font>'''</big> | |<big>'''<font size="5">5</font>'''</big> | ||
| − | |Click a '''Work Request''' to | + | |Click a specific '''Work Request''' to select the one to be changed. |
| + | |||
[[File:Work Request DispatchFilter2ResultsChoose.png|1000x1000px]] | [[File:Work Request DispatchFilter2ResultsChoose.png|1000x1000px]] | ||
|} | |} | ||
| Line 32: | Line 35: | ||
|- style="vertical-align:top;" | |- style="vertical-align:top;" | ||
|<big>'''<font size="5">1</font>'''</big> | |<big>'''<font size="5">1</font>'''</big> | ||
| − | | | + | |With a '''Work Request''' selected, determine which work request detail will be changed. |
| + | |||
[[File:Work Request DispatchFilter2ResultsChoose.png|1000x1000px]] | [[File:Work Request DispatchFilter2ResultsChoose.png|1000x1000px]] | ||
| Line 38: | Line 42: | ||
|<big>'''<font size="5">2</font>'''</big> | |<big>'''<font size="5">2</font>'''</big> | ||
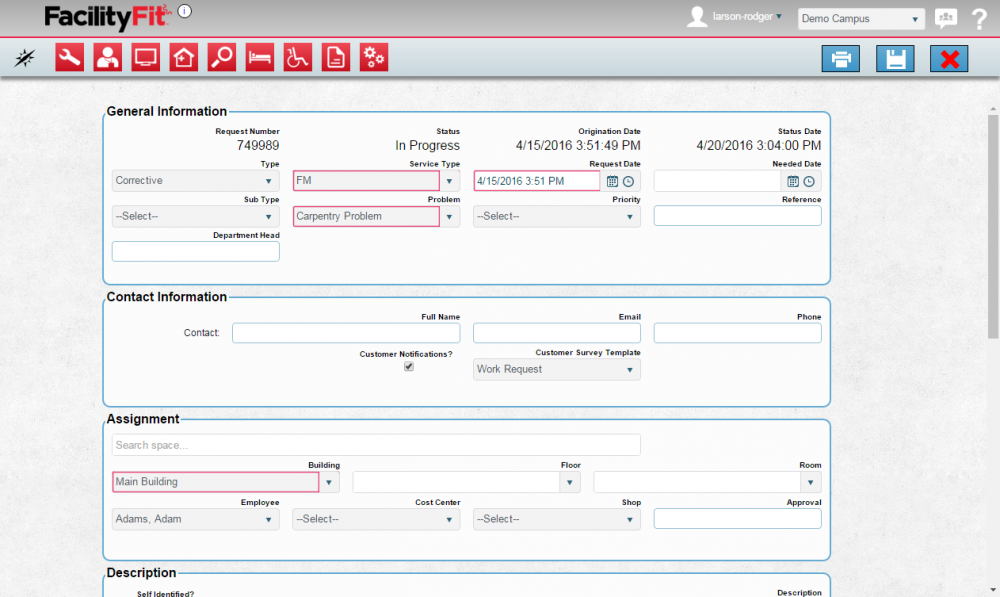
|Click the '''Edit''' button [[File:EditLarge.png|48x48px]] to open the edit Work Request window. | |Click the '''Edit''' button [[File:EditLarge.png|48x48px]] to open the edit Work Request window. | ||
| + | The Edit Work Request window provides a long page full of mandatory and optional fields that can be changed on work requests. | ||
| + | Employees can be assigned, but work request status cannot be changed in this window. | ||
| + | Note: Materials information can be added in the edit window. | ||
| + | |||
| + | |||
[[File:Work Request DispatchFilter2ResultsChooseEdit.png|1000x1000px]] | [[File:Work Request DispatchFilter2ResultsChooseEdit.png|1000x1000px]] | ||
| Line 49: | Line 58: | ||
|- style="vertical-align:top;" | |- style="vertical-align:top;" | ||
|<big>'''<font size="5">1</font>'''</big> | |<big>'''<font size="5">1</font>'''</big> | ||
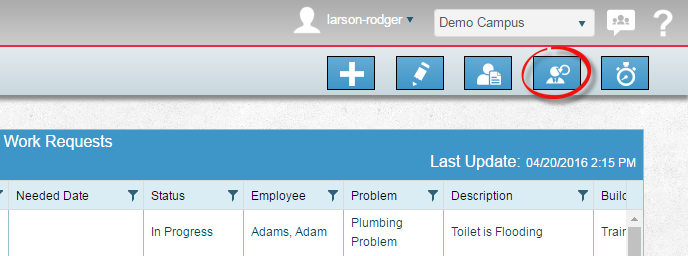
| − | | | + | |If the only change is the employee assignment, this is a fast way to assign a work request. |
| + | With a Work Request selected, click the '''Assign Work Request''' button [[File:DispatchAssign.png]] to open the Assign Work Request window. | ||
| + | The Assign Work Request Window only includes a dropdown of employees available to be assigned. | ||
| + | |||
[[File:DispatchAssignbutton.png]] | [[File:DispatchAssignbutton.png]] | ||
|- style="vertical-align:top;" | |- style="vertical-align:top;" | ||
|<big>'''<font size="5">2</font>'''</big> | |<big>'''<font size="5">2</font>'''</big> | ||
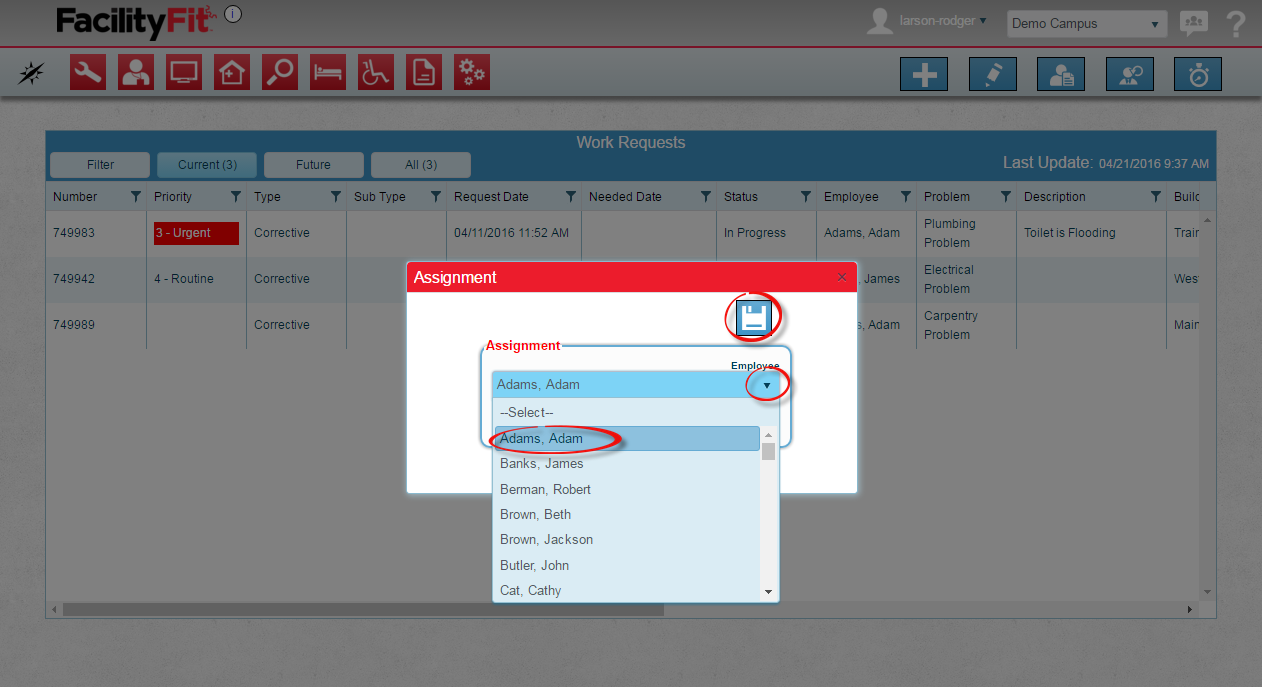
| − | | | + | |From the employee dropdown list, select the '''Employee Name''' to be assigned, and click on the'''Save''' button. |
| + | [[File:WorkRequest-DispatchAssignment.png]] | ||
|} | |} | ||
| Line 64: | Line 77: | ||
|- style="vertical-align:top;" | |- style="vertical-align:top;" | ||
|<big>'''<font size="5">1</font>'''</big> | |<big>'''<font size="5">1</font>'''</big> | ||
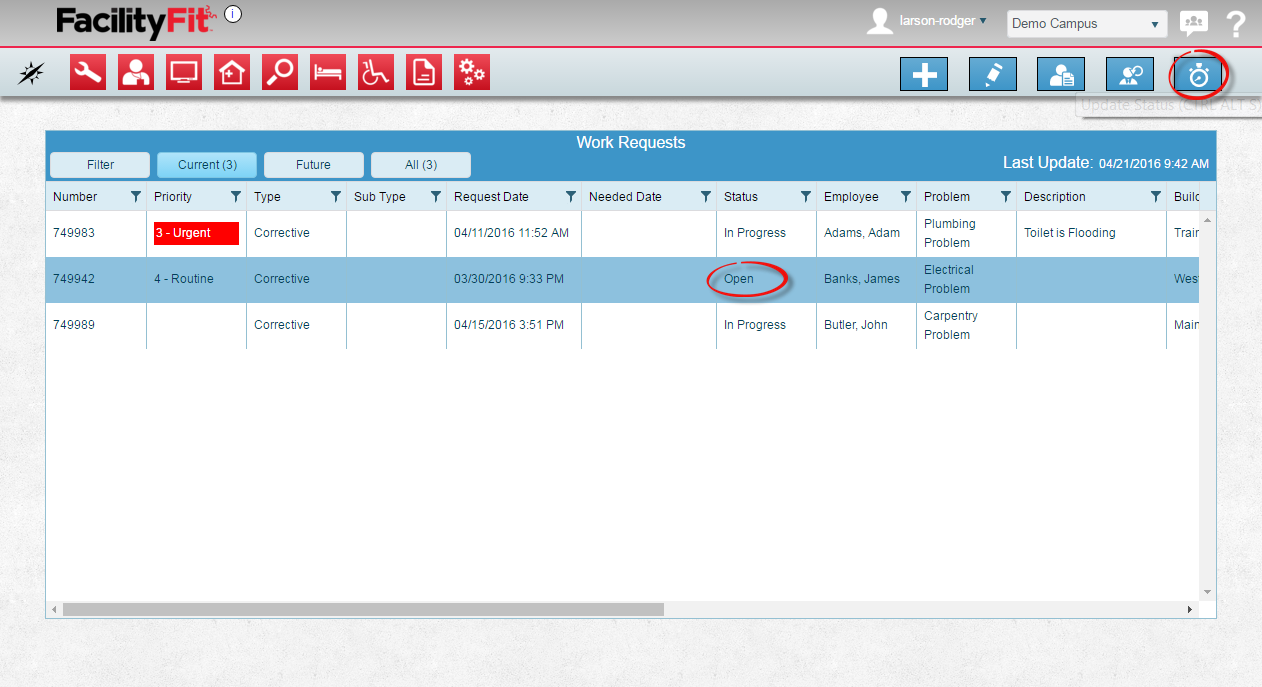
| − | | | + | |With a Work Request selected, click the '''Update Status''' button [[File:UpdateStatus-ClockButton.png]] to open the update status window for that work request. |
| − | + | ||
| − | [[File: | + | |
[[File:WorkRequest-DispatchUpdateStatus.png]] | [[File:WorkRequest-DispatchUpdateStatus.png]] | ||
| Line 73: | Line 84: | ||
|- style="vertical-align:top;" | |- style="vertical-align:top;" | ||
|<big>'''<font size="5">2</font>'''</big> | |<big>'''<font size="5">2</font>'''</big> | ||
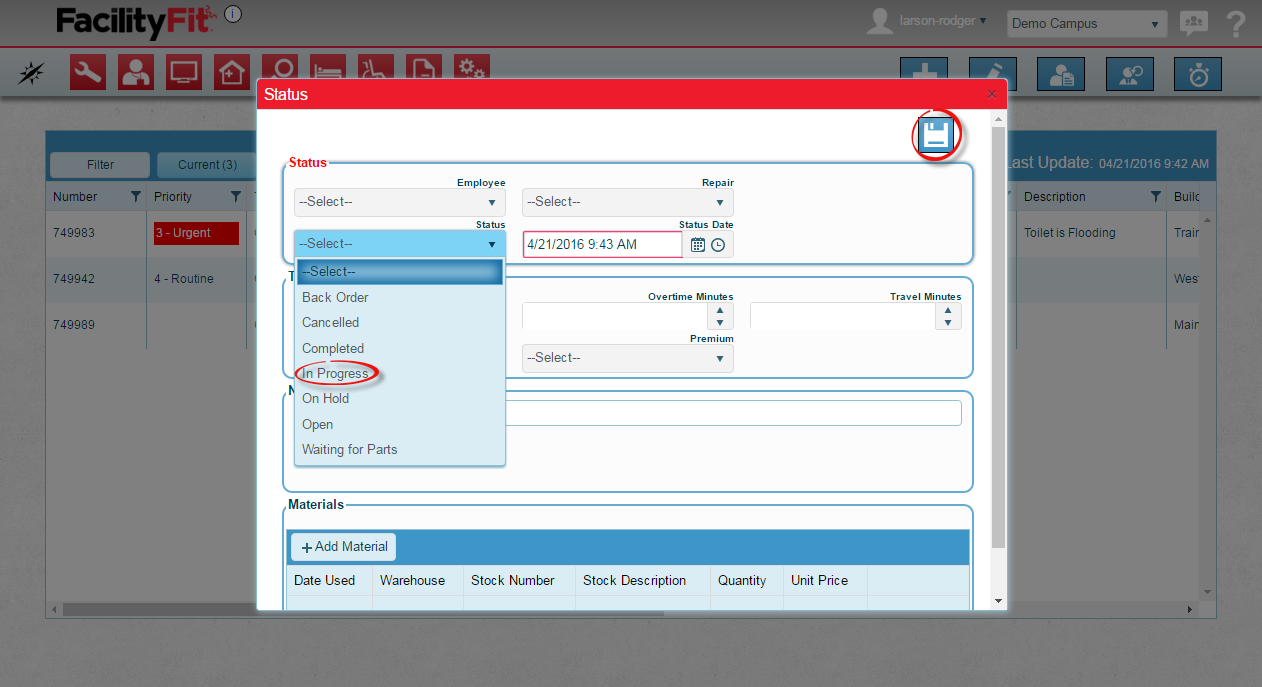
| − | | | + | |Select the new status from the status dropdown list. |
| + | |||
[[File:WorkRequest-DispatchUpdateStatusDD.png]] | [[File:WorkRequest-DispatchUpdateStatusDD.png]] | ||
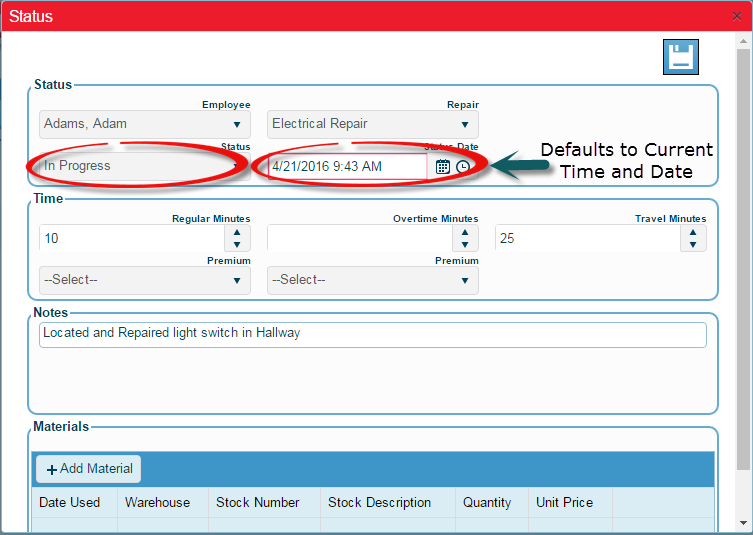
| + | Fill in other details if needed. Click the '''Save''' button to save the new status. | ||
| + | |||
[[File:WorkRequest-DispatchUpdateStatusDDCompleted.png]] | [[File:WorkRequest-DispatchUpdateStatusDDCompleted.png]] | ||
|} | |} | ||
Revision as of 08:17, 21 April 2016
Contents
Dispatch
Edit a Work Request Dispatch
Assign a Work Request Dispatch
