Difference between revisions of "Step-by-Step Inspections"
From MyFacilityFitPro_Wiki
(→Add New Inspections) (Tag: VisualEditor) |
|||
| Line 4: | Line 4: | ||
{| class="wikitable" | {| class="wikitable" | ||
|- | |- | ||
| − | |||
| − | |||
| − | |||
|- style="vertical-align:top;" | |- style="vertical-align:top;" | ||
|<big>'''<font size="5">1</font>'''</big> | |<big>'''<font size="5">1</font>'''</big> | ||
| Line 24: | Line 21: | ||
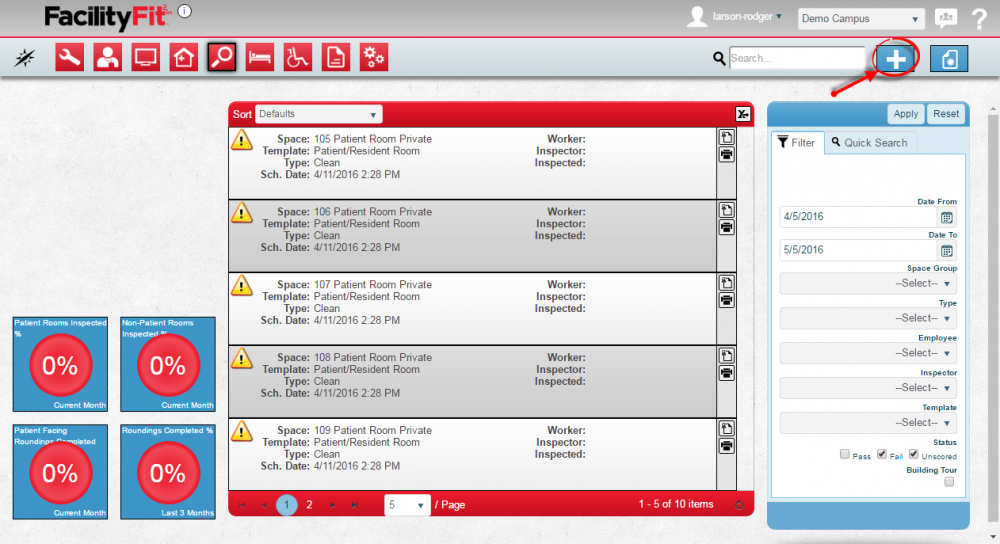
|The Inspection window will open. Click the '''Add By Type''' button to open the window for that type. | |The Inspection window will open. Click the '''Add By Type''' button to open the window for that type. | ||
[[File:Inspections-AddInspection2.png|800x800px]] | [[File:Inspections-AddInspection2.png|800x800px]] | ||
| + | |||
| + | If All Campuses is selected, the window will include the campus field. | ||
| + | [[File:Inspections-AllCampuses.png|800x800px]] | ||
| + | |} | ||
| + | |||
| + | == Add By Work Request == | ||
| + | '''Add Inspections by Work Request'''. This is how you will create an inspection record for use on a Campus. | ||
| + | |||
| + | {| class="wikitable" | ||
| + | |- | ||
| + | |||
| + | |- style="vertical-align:top;" | ||
| + | |<big>'''<font size="5">1</font>'''</big> | ||
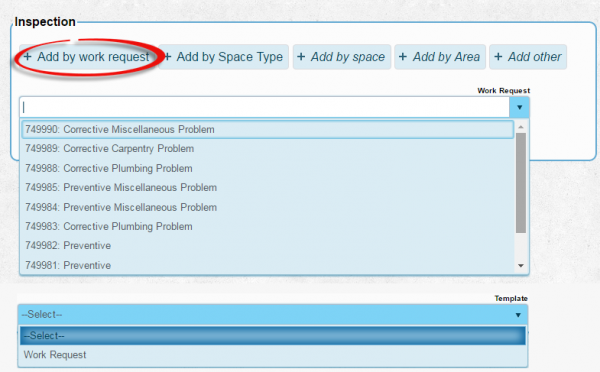
| + | |Click the '''Add By Work Request''' button to show the add by work request fields. | ||
| + | Click the '''Work Request''' dropdown and select the work request number. The list shown depends on the Campus selected. Press the '''Save''' button to move to the next screen. | ||
| + | [[File:Inspection-AddByWorkRequest.png|600px]] | ||
| + | |||
| + | |- style="vertical-align:top;" | ||
| + | |<big>'''<font size="5">2</font>'''</big> | ||
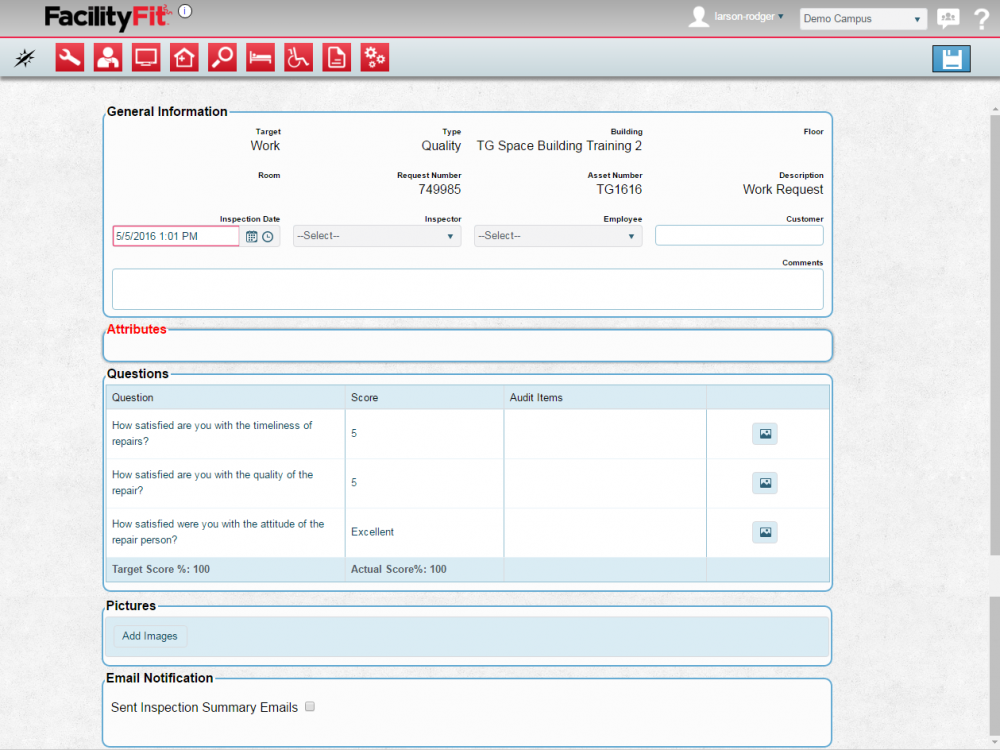
| + | |The Inspection page opens. Inspection Date is required before the page will save. | ||
| + | Fill out sections for: | ||
| + | General Information | ||
| + | Attributes | ||
| + | Questions | ||
| + | Pictures | ||
| + | Email Notification | ||
| + | |||
| + | [[File:Inspection-AddNewInspectionbyWR3.png|1000x1000px]] | ||
| + | |||
| + | |||
| + | |- style="vertical-align:top;" | ||
| + | |<big>'''<font size="5">3</font>'''</big> | ||
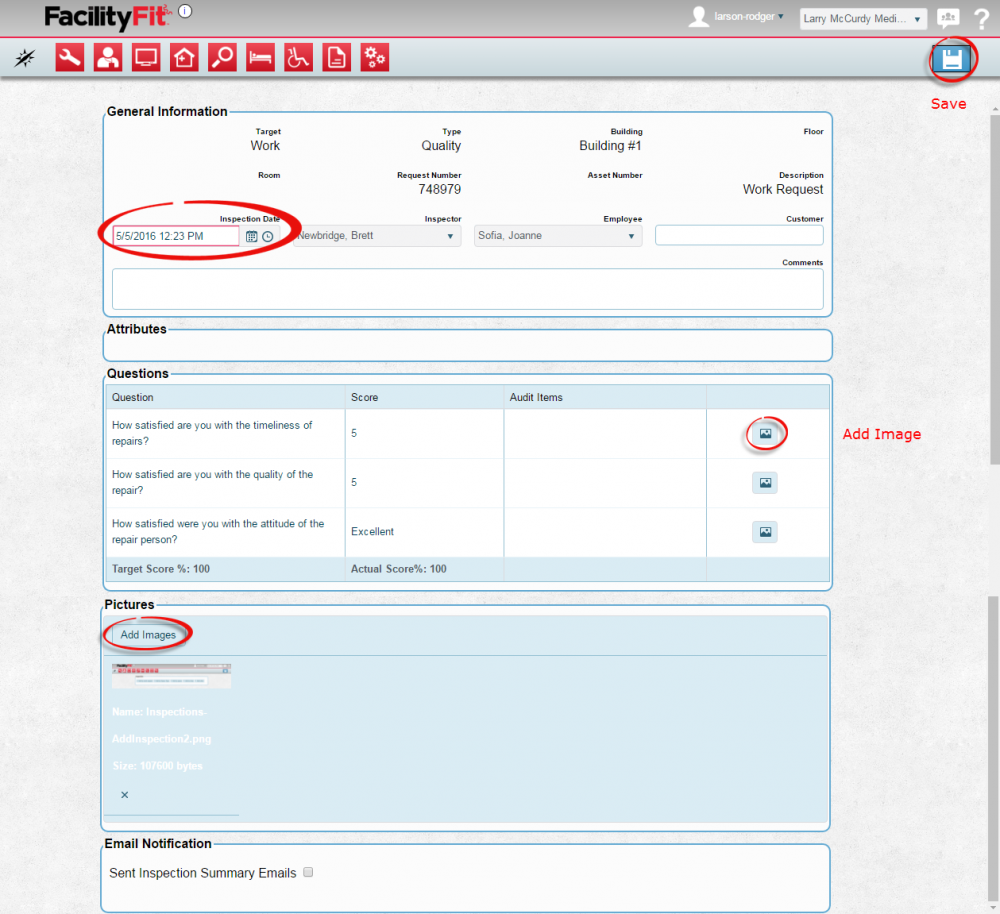
| + | |Enter other information if available. Add Images if available. Press the '''Save''' button when finished. | ||
| + | [[File:Inspection-AddNewInspectionbyWR4.png|1000x1000px]] | ||
|- style="vertical-align:top;" | |- style="vertical-align:top;" | ||
|<big>'''<font size="5">4</font>'''</big> | |<big>'''<font size="5">4</font>'''</big> | ||
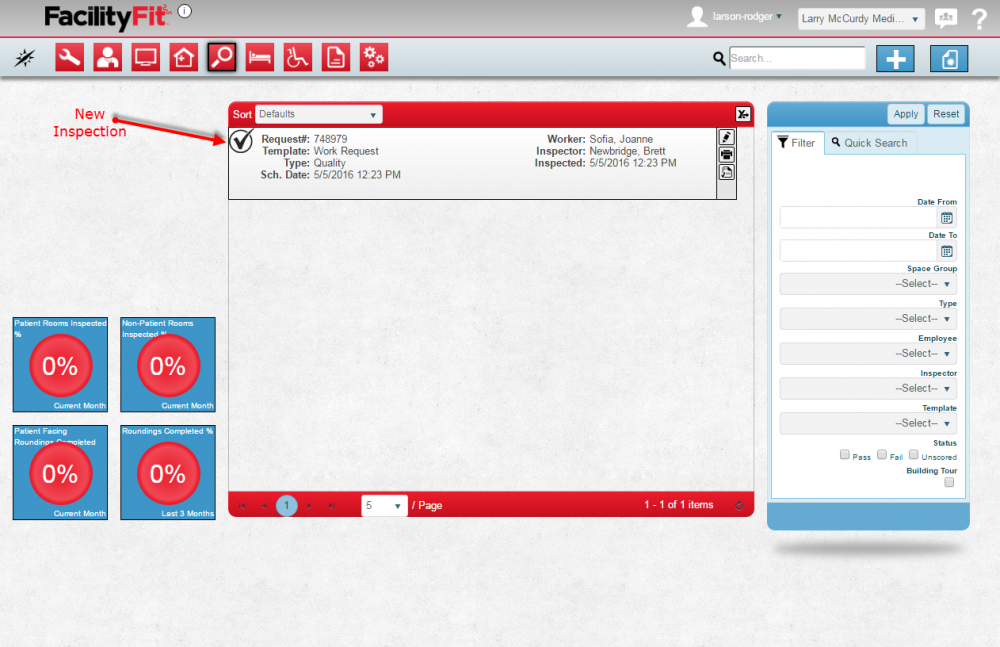
| + | |The newly added inspection will appear on in the Inspections view when that Campus is selected. | ||
| + | [[File:Inspection-NewAddedInspectionListed.png|1000x1000px]] | ||
| + | |} | ||
| + | |||
| + | |||
| + | == Add By Space Type == | ||
| + | '''Add Inspections by space type'''. This is how you will create an inspection record for use on a Campus. | ||
| + | |||
| + | {| class="wikitable" | ||
| + | |- | ||
| + | |||
| + | |- style="vertical-align:top;" | ||
| + | |<big>'''<font size="5">1</font>'''</big> | ||
| − | |Click the ''' | + | |Click the '''Add By Space Type''' button to open the add by work request window. Select the '''Space Type''' by using the dropdown list. |
| + | [[File:Inspection-AddBySpaceType.png|600px]] | ||
|- style="vertical-align:top;" | |- style="vertical-align:top;" | ||
| − | |<big>'''<font size="5">5</font>'''</big> | + | |<big>'''<font size="5">2</font>'''</big> |
| + | |||
| + | |Type in a '''Room Name''' and select a '''Space''' type from the dropdown list. Certain spec type may have templates associated with them. The template field may appear if certain space types are selected. | ||
| + | [[File:Inspection-AddBySpaceType2.png|1000x1000px]] | ||
| + | |||
| + | |- style="vertical-align:top;" | ||
| + | |<big>'''<font size="5">3</font>'''</big> | ||
| + | |||
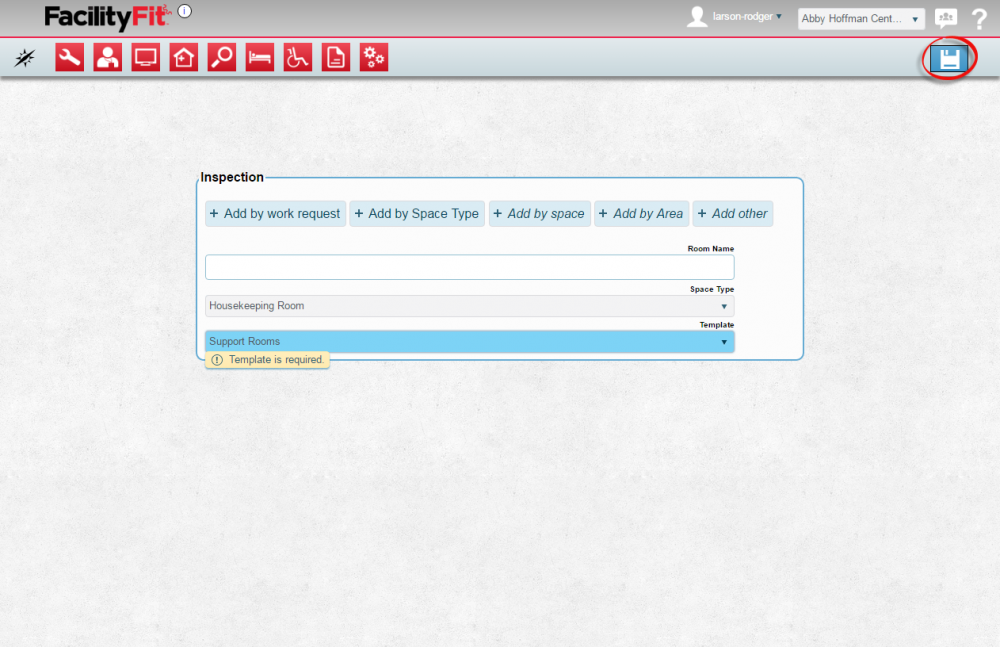
| + | |If it appears, click the '''Template''' dropdown and select a template from the list. | ||
| + | Click the '''Save''' button to open the Inspection window. | ||
| + | [[File:Inspection-AddBySpaceType3.png|1000x1000px]] | ||
| + | |||
| + | |- style="vertical-align:top;" | ||
| + | |<big>'''<font size="5">4</font>'''</big> | ||
| + | |||
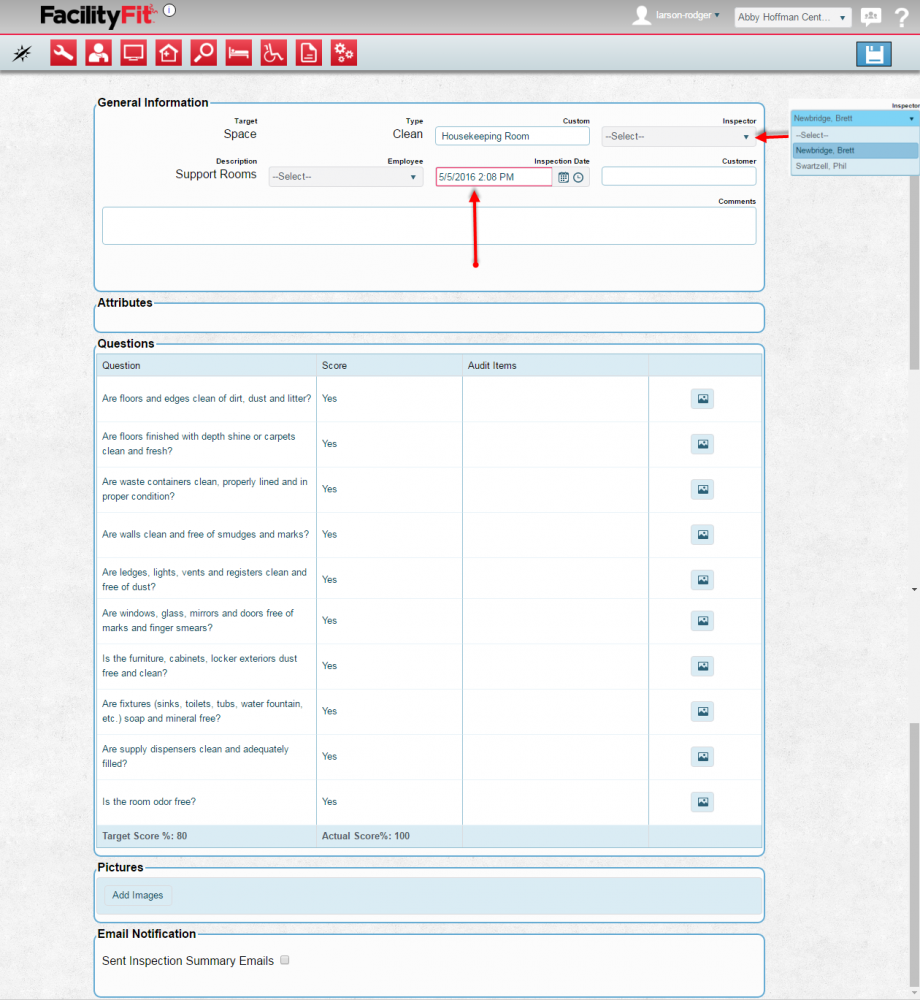
| + | |Select an Inspection Date and select an Inspector (required). Click the '''Save''' button to complete the new inspection. | ||
| + | [[File:Inspection-AddBySpaceType4.png|1000x1000px]] | ||
| + | |} | ||
| + | |||
| + | |||
| + | == Add By Space == | ||
| + | '''Add Inspections by Space'''. This is how you will create an inspection record by Space for use on a Campus. | ||
| + | |||
| + | {| class="wikitable" | ||
| + | |- | ||
| + | |||
| + | |- style="vertical-align:top;" | ||
| + | |<big>'''<font size="5">1</font>'''</big> | ||
| + | |||
| + | |Click the '''Add By Space''' button to open the add by space fields in the window. | ||
| + | |||
| + | [[File:Inspection-AddBySpace.png|1000x1000px]] | ||
| + | |||
| + | |- style="vertical-align:top;" | ||
| + | |<big>'''<font size="5">2</font>'''</big> | ||
| + | |||
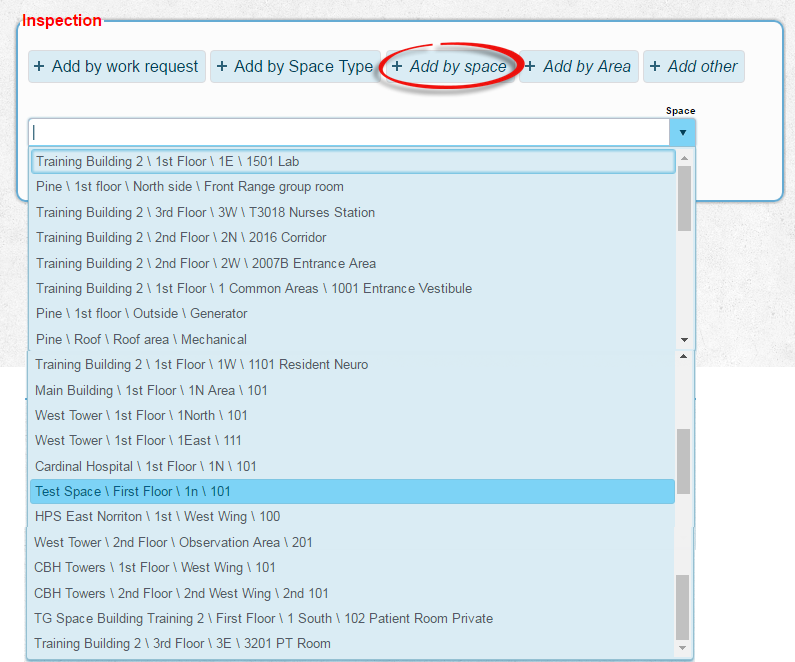
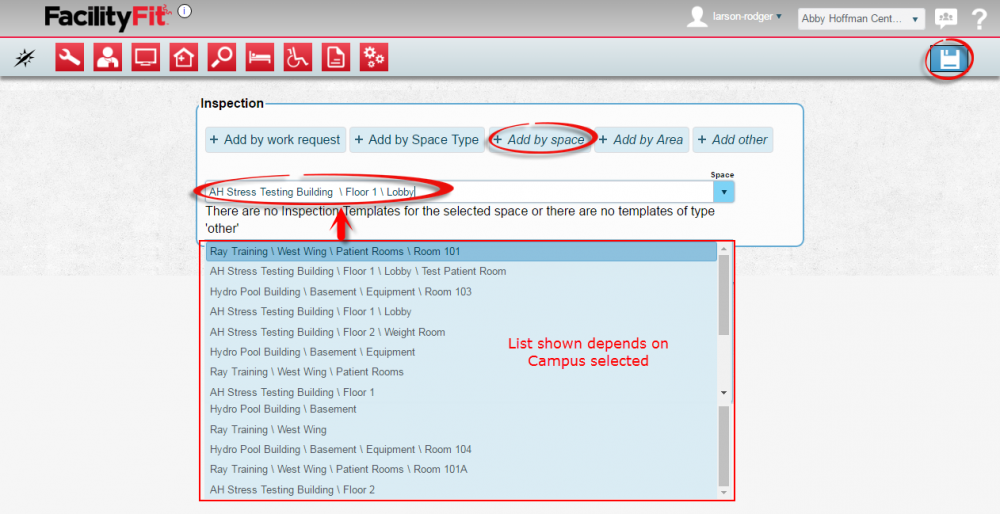
| + | |Click the '''Space''' dropdown button to open the list of spaces. Select a space and press the '''Save''' button to continue to the next screen. | ||
| + | [[File:Inspection-addbySpace3.png|1000x1000px]] | ||
| + | |||
| + | |- style="vertical-align:top;" | ||
| + | |<big>'''<font size="5">2</font>'''</big> | ||
| + | |||
| + | |Enter the information required and press the '''Save''' button to finish. | ||
| + | [[File:Inspection-AddNewInspectionbyWR3.png|1000x1000px]] | ||
| + | |} | ||
| + | |||
| + | |||
| + | == Add By Area == | ||
| + | '''Add Inspections by Area'''. This is how you will create an inspection record by Area for use on a Campus. | ||
| + | |||
| + | {| class="wikitable" | ||
| + | |- | ||
| + | |||
| + | |- style="vertical-align:top;" | ||
| + | |<big>'''<font size="5">1</font>'''</big> | ||
| + | |||
| + | |Click the '''Add By Area''' button to open the add by area fields in the window. | ||
| + | [[File:Inspection-AddByAreaRMN.png|1000x1000px]] | ||
| + | |||
| + | |- style="vertical-align:top;" | ||
| + | |<big>'''<font size="5">2</font>'''</big> | ||
| + | |||
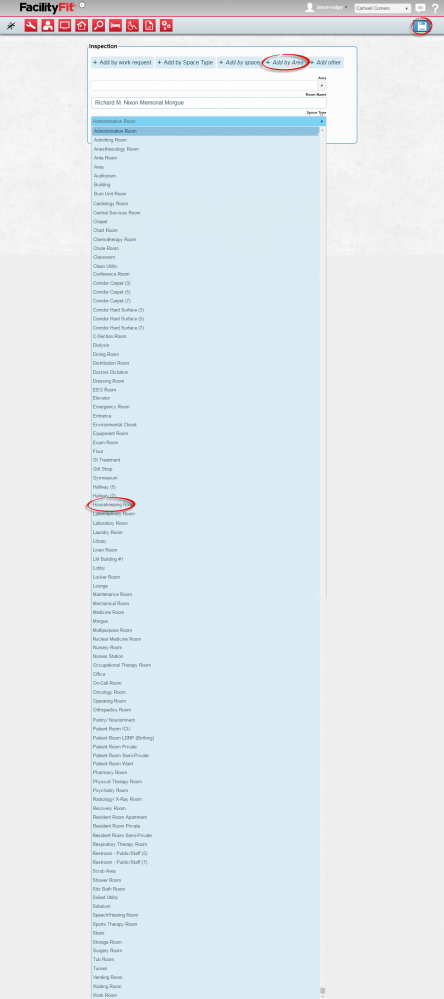
| + | |Select from the '''Area''' dropdown and Type a room Name. Select a Space Type from the dropdown list. | ||
| + | Click the '''Special''' button to open the Special window | ||
| + | [[File:Inspection-AddByArea2.png|1000x1000px]] | ||
| + | |||
| + | |- style="vertical-align:top;" | ||
| + | |<big>'''<font size="5">3</font>'''</big> | ||
| + | |||
| + | |Press the '''Save''' button | ||
| + | |} | ||
| + | |||
| + | |||
| + | == Add Other == | ||
| + | '''Add Inspections'''. This is how you will create an inspection record for use on a Campus. | ||
| + | |||
| + | {| class="wikitable" | ||
| + | |- | ||
| + | |||
| + | |- style="vertical-align:top;" | ||
| + | |<big>'''<font size="5">1</font>'''</big> | ||
| + | |||
| + | |Click the '''Add Other''' button to open the add by work request window | ||
| + | [[File:AddAssetSelected.png|1000x1000px]] | ||
| + | |||
| + | |||
| + | |- style="vertical-align:top;" | ||
| + | |<big>'''<font size="5">2</font>'''</big> | ||
|Click the '''Special''' button to open the Special window | |Click the '''Special''' button to open the Special window | ||
Revision as of 12:00, 5 May 2016
Contents
Add New Inspections
Add Inspections. This is how you will create an inspection record for use on a Campus.
Add By Work Request
Add Inspections by Work Request. This is how you will create an inspection record for use on a Campus.
Add By Space Type
Add Inspections by space type. This is how you will create an inspection record for use on a Campus.
| 1 | Click the Add By Space Type button to open the add by work request window. Select the Space Type by using the dropdown list. |
| 2 | Type in a Room Name and select a Space type from the dropdown list. Certain spec type may have templates associated with them. The template field may appear if certain space types are selected. |
| 3 | If it appears, click the Template dropdown and select a template from the list. |
| 4 | Select an Inspection Date and select an Inspector (required). Click the Save button to complete the new inspection. |
Add By Space
Add Inspections by Space. This is how you will create an inspection record by Space for use on a Campus.
| 1 | Click the Add By Space button to open the add by space fields in the window. |
| 2 | Click the Space dropdown button to open the list of spaces. Select a space and press the Save button to continue to the next screen. |
| 2 | Enter the information required and press the Save button to finish. |
Add By Area
Add Inspections by Area. This is how you will create an inspection record by Area for use on a Campus.
| 1 | Click the Add By Area button to open the add by area fields in the window. |
| 2 | Select from the Area dropdown and Type a room Name. Select a Space Type from the dropdown list. |
| 3 | Press the Save button |
Add Other
Add Inspections. This is how you will create an inspection record for use on a Campus.
| 1 | Click the Add Other button to open the add by work request window
|
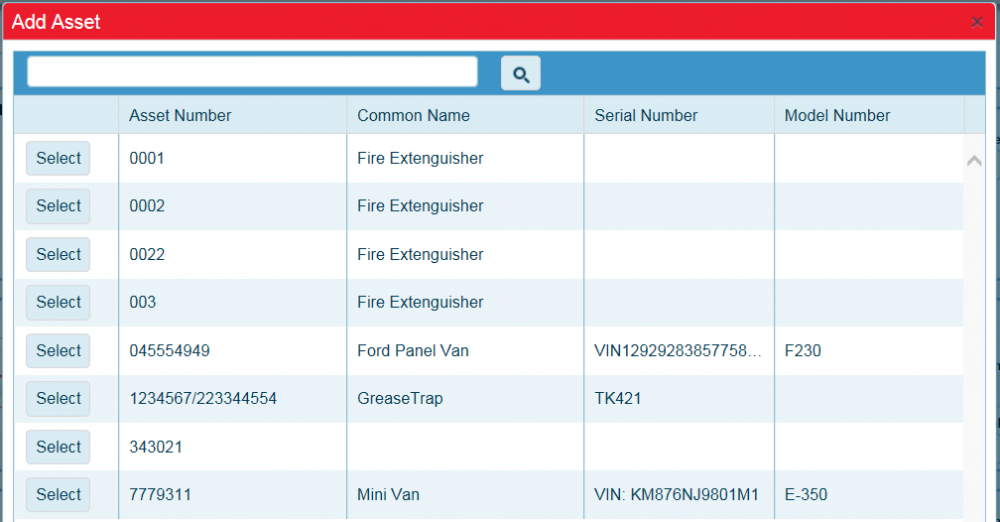
| 2 | Click the Special button to open the Special window
|

