Difference between revisions of "Assign a Work Request"
From MyFacilityFitPro_Wiki
(Created page with "== Assign a Work Request == {| class="wikitable" |<big>'''<font size="5">1</font>'''</big> | Click '''Add''' to Create a new Work Request.<br> |- |<big>'''<font size="5">2</f...") (Tag: VisualEditor) |
m (→Assign a Work Request) (Tag: VisualEditor) |
||
| Line 1: | Line 1: | ||
| + | Assign an employee to a work request. | ||
| + | |||
== Assign a Work Request == | == Assign a Work Request == | ||
{| class="wikitable" | {| class="wikitable" | ||
|<big>'''<font size="5">1</font>'''</big> | |<big>'''<font size="5">1</font>'''</big> | ||
| − | | Click ''' | + | | Click '''the''' Work Request icon to open the work request window.<br>[[File:MenuWorkRequests.png|left|thumb]] |
|- | |- | ||
|<big>'''<font size="5">2</font>'''</big> | |<big>'''<font size="5">2</font>'''</big> | ||
| − | | | + | |Find the Work Request that is going to be assigned to an employee.[[File:AssignWorkOrder2.png|left|thumb|671x671px]]<br> |
|- | |- | ||
| − | |<big> | + | |<big><font size="5">'''3'''</font></big> |
| − | | | + | |Select the '''Assign''' icon from the right end of the Work Request row. |
| + | |||
| + | [[File:AssignIcon.PNG|left|thumb|701x701px]] | ||
|- | |- | ||
|<big>'''<font size="5">4</font>'''</big> | |<big>'''<font size="5">4</font>'''</big> | ||
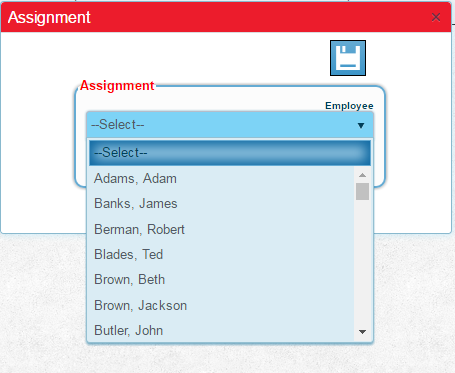
| − | | | + | |The Assignment window opens. Select the Employee dropdown to see a list of employees. |
| + | |||
| + | [[File:AssignDropdownList.png|left|thumb|455x455px]] | ||
|- | |- | ||
|<big>'''<font size="5">5</font>'''</big> | |<big>'''<font size="5">5</font>'''</big> | ||
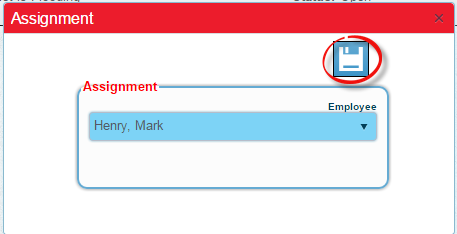
| − | | | + | |Choose an employee to be assigned to the Work Request. Press the '''Save''' icon. |
| + | |||
| + | [[File:AssignMark1.PNG|left|thumb|457x457px]] | ||
|- | |- | ||
|<big>'''<font size="5">6</font>'''</big> | |<big>'''<font size="5">6</font>'''</big> | ||
| − | | | + | |The window will return to the work order. Note that the Employee chosen has been assigned. |
| − | + | ||
| − | | | + | [[File:AssignMarkComplete.png|left|thumb|644x644px]] |
| − | | | + | |
| − | + | ||
| − | + | ||
| − | + | ||
| − | + | ||
| − | + | ||
| − | + | ||
| − | + | ||
| − | + | ||
| − | + | ||
| − | + | ||
| − | | | + | |
|} | |} | ||
Revision as of 11:54, 13 April 2016
Assign an employee to a work request.
Assign a Work Request
| 1 | Click the Work Request icon to open the work request window. |
| 2 | Find the Work Request that is going to be assigned to an employee. |
| 3 | Select the Assign icon from the right end of the Work Request row. |
| 4 | The Assignment window opens. Select the Employee dropdown to see a list of employees. |
| 5 | Choose an employee to be assigned to the Work Request. Press the Save icon. |
| 6 | The window will return to the work order. Note that the Employee chosen has been assigned. |


