Difference between revisions of "Creating inspections"
(Created page with "=Overview= Creating an Inspection in ISISweb consists of two steps.\\ '''1. Create an appropriate template (Optional)'''\\\\ An Inspection Template is a form that is use...") |
(→Create a Single Inspection) (Tag: VisualEditor) |
||
| (4 intermediate revisions by one other user not shown) | |||
| Line 1: | Line 1: | ||
| − | = | + | == Generate Inspections == |
| − | + | Generating an Inspection in FacilityFit consists of two steps. | |
| − | + | ||
| − | + | ||
| + | {| class="wikitable" | ||
| + | |- style="vertical-align:top;" | ||
| + | |<big>'''<font size="5">1</font>'''</big> | ||
| + | |'''Create an appropriate template (Optional)''' | ||
| + | An Inspection Template is a form that is used to create a new Inspection when needed. The template has all of the information required to create an inspection, such as the questions that need to be answered, the type of space to be inspected and the attributes to be recorded. | ||
''Note that an Inspection Template only needs to be created if an appropriate Template does not already exist in the system. If an appropriate Template already exists, you may skip to step 2.'' | ''Note that an Inspection Template only needs to be created if an appropriate Template does not already exist in the system. If an appropriate Template already exists, you may skip to step 2.'' | ||
| − | |||
| − | |||
| − | |||
| + | |- style="vertical-align:top;" | ||
| + | |<big>'''<font size="5">2</font>'''</big> | ||
| + | |'''Create an Inspection or Generate Multiple Inspections''' | ||
| + | Once the Templates are in place, you may create Inspections from them. An Inspection represents a singe point at which work is reviewed and questions are answered. You may create one if you want to review a specific work item, or you may have the system generate several inspections by a given set of rules. | ||
| + | |} | ||
| − | ==Create an | + | ==Create an Appropriate Template== |
| − | ====Set up the | + | ====Set up the General Information==== |
| − | + | {| class="wikitable" | |
| − | + | |- style="vertical-align:top;" | |
| − | + | |<big>'''<font size="5">1</font>'''</big> | |
| − | + | ||
| − | + | |From the main menu, navigate to Administration | |
| + | [[File:Administration.png]] | ||
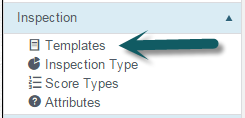
| + | Find the Inspection Section, and click on '''Templates''' | ||
| + | [[File:AdminInspection.png]] | ||
| + | Click on '''Add Template.''' | ||
| + | [[File:AddTemplate.png]] | ||
| + | |||
| + | |- style="vertical-align:top;" | ||
| + | |<big>'''<font size="5">2</font>'''</big> | ||
| + | |You will be presented with the following screen | ||
[[File:TemplateHeader.png]] | [[File:TemplateHeader.png]] | ||
| − | + | Enter a '''Description'''. | |
| − | + | ||
| − | + | |- style="vertical-align:top;" | |
| − | + | |<big>'''<font size="5">3</font>'''</big> | |
| − | + | |Leave '''Selectable''' checked. | |
| − | + | ||
| − | + | |- style="vertical-align:top;" | |
| + | |<big>'''<font size="5">4</font>'''</big> | ||
| + | |Change the '''Target Percentage'''. This is the final score that is needed for the inspection to Pass. | ||
| + | Choose an '''Inspection Target'''. This is where you choose if the Inspection is for a Space, Work Order, or Other item. | ||
| + | |||
| + | |- style="vertical-align:top;" | ||
| + | |<big>'''<font size="5">5</font>'''</big> | ||
| + | |Enter a '''Report Header''' and '''Report Footer'''. Report Headers and Footers are information that needs to be included on every inspection. Any notes that must show on each inspection should be entered here. Headers print at the top of the Inspection and Footers print at the bottom. | ||
| + | |||
| + | |- style="vertical-align:top;" | ||
| + | |<big>'''<font size="5">6</font>'''</big> | ||
| + | |Choose a '''Type'''. This will be the type of Inspection that is created. This is for grouping and reporting purposes. You may [[create a new Inspection Type]] if needed. | ||
| + | |||
| + | |- style="vertical-align:top;" | ||
| + | |<big>'''<font size="5">7</font>'''</big> | ||
| + | |Click '''Save''' | ||
| + | *The system will return you to the list of templates. | ||
| + | |||
| + | |- style="vertical-align:top;" | ||
| + | |<big>'''<font size="5">8</font>'''</big> | ||
| + | |Find the template you just created and and select the '''Edit''' button. | ||
| + | |||
| + | [[File:Edit Template.png|/New Inspections version/Edit Template.png]] | ||
| + | |} | ||
| + | |||
| − | |||
| − | |||
| − | |||
====Associate Space Groups==== | ====Associate Space Groups==== | ||
| − | Associated Space Groups tell the system what types of Spaces may be inspected with this Template. For instance, some questions may only be valid for a patient room and others may only be valid for non-patient areas. Choosing the right Space Groups ensures that you are asking the right questions for the space being inspected. | + | {| class="wikitable" |
| + | |- style="vertical-align:top;" | ||
| + | |<big>'''<font size="5">1</font>'''</big> | ||
| + | |Associated Space Groups tell the system what types of Spaces may be inspected with this Template. For instance, some questions may only be valid for a patient room and others may only be valid for non-patient areas. Choosing the right Space Groups ensures that you are asking the right questions for the space being inspected. | ||
| − | [[file: | + | [[file:InspectionSpaceGroups.png]] |
| + | |||
| + | |- style="vertical-align:top;" | ||
| + | |<big>'''<font size="5">2</font>'''</big> | ||
| + | |Click '''Add Space Group'''. | ||
| + | |||
| + | |- style="vertical-align:top;" | ||
| + | |<big>'''<font size="5">3</font>'''</big> | ||
| + | |Choose a '''group'''. | ||
| + | |||
| + | |- style="vertical-align:top;" | ||
| + | |<big>'''<font size="5">4</font>'''</big> | ||
| + | |Choose a '''frequency'''. | ||
| + | |||
| + | |- style="vertical-align:top;" | ||
| + | |<big>'''<font size="5">5</font>'''</big> | ||
| + | |Check '''Generate''' if appropriate. This will allow the Template to be used during Inspection Generation. | ||
| + | |||
| + | |- style="vertical-align:top;" | ||
| + | |<big>'''<font size="5">6</font>'''</big> | ||
| + | |Click '''Save''' on this row. It is the button with the check mark. | ||
| + | |||
| + | |- style="vertical-align:top;" | ||
| + | |<big>'''<font size="5">7</font>'''</big> | ||
| + | |Repeat for as many space groups as needed. <img src='/isiswebhelp/Attachments/Warning24.png'> | ||
| + | '''Inspections may only use this template if the space chosen is in the Space Group list for the Template.''' | ||
| + | |} | ||
| − | |||
| − | |||
| − | |||
| − | |||
| − | |||
| − | |||
| − | |||
====Create Attributes==== | ====Create Attributes==== | ||
| − | Attributes are questions that should be answered for record keeping, but do not count against the final score of the Inspection. For instance, it might be important to know if a hospital room is occupied when being inspected as this might affect the inspection process, but the answer does not change the Pass/Fail score. | + | {| class="wikitable" |
| + | |- style="vertical-align:top;" | ||
| + | |<big>'''<font size="5">1</font>'''</big> | ||
| + | |Attributes are questions that should be answered for record keeping, but do not count against the final score of the Inspection. For instance, it might be important to know if a hospital room is occupied when being inspected as this might affect the inspection process, but the answer does not change the Pass/Fail score. | ||
[[File:InspectionAttributes.png]] | [[File:InspectionAttributes.png]] | ||
| − | + | |- style="vertical-align:top;" | |
| − | + | |<big>'''<font size="5">2</font>'''</big> | |
| − | + | |Click '''Add Attribute''' | |
| − | + | ||
| − | + | |- style="vertical-align:top;" | |
| − | + | |<big>'''<font size="5">3</font>'''</big> | |
| + | |Choose a defined '''Attribute type'''. You may [[create a New Inspection Attribute]] if needed. | ||
| + | |||
| + | |- style="vertical-align:top;" | ||
| + | |<big>'''<font size="5">4</font>'''</big> | ||
| + | |Choose Required if appropriate | ||
| + | |||
| + | |- style="vertical-align:top;" | ||
| + | |<big>'''<font size="5">5</font>'''</big> | ||
| + | |Click save on this row | ||
| + | |||
| + | |- style="vertical-align:top;" | ||
| + | |<big>'''<font size="5">6</font>'''</big> | ||
| + | |Repeat for as many attributes as needed | ||
| + | |||
| + | |} | ||
====Create Questions==== | ====Create Questions==== | ||
| + | {| class="wikitable" | ||
| + | |- style="vertical-align:top;" | ||
| + | |<big>'''<font size="5">1</font>'''</big> | ||
| + | |Click '''Add Question''' | ||
[[File:InspectionQuestions.png]] | [[File:InspectionQuestions.png]] | ||
| − | |||
| − | |||
| − | |||
| − | |||
| − | |||
| − | |||
| − | + | |- style="vertical-align:top;" | |
| + | |<big>'''<font size="5">2</font>'''</big> | ||
| + | |Modify '''Order''' if needed. The questions are displayed in order from lowest to highest. | ||
| − | + | |- style="vertical-align:top;" | |
| − | + | |<big>'''<font size="5">3</font>'''</big> | |
| − | + | |Type the text of the '''question''' | |
| − | + | ||
| − | ==Create an Inspection or Generate | + | |- style="vertical-align:top;" |
| + | |<big>'''<font size="5">4</font>'''</big> | ||
| + | |Enter a '''weight'''. The weight indicates how important a question is. If all of the weights are the same then all questions are equally important. If you give one question a weight of 2, it will then be counted as twice as important as another question that only has a weight of 1. | ||
| + | |||
| + | |- style="vertical-align:top;" | ||
| + | |<big>'''<font size="5">5</font>'''</big> | ||
| + | |Select a '''score type'''. You may [[create a new score type]] if needed. | ||
| + | |||
| + | |- style="vertical-align:top;" | ||
| + | |<big>'''<font size="5">6</font>'''</big> | ||
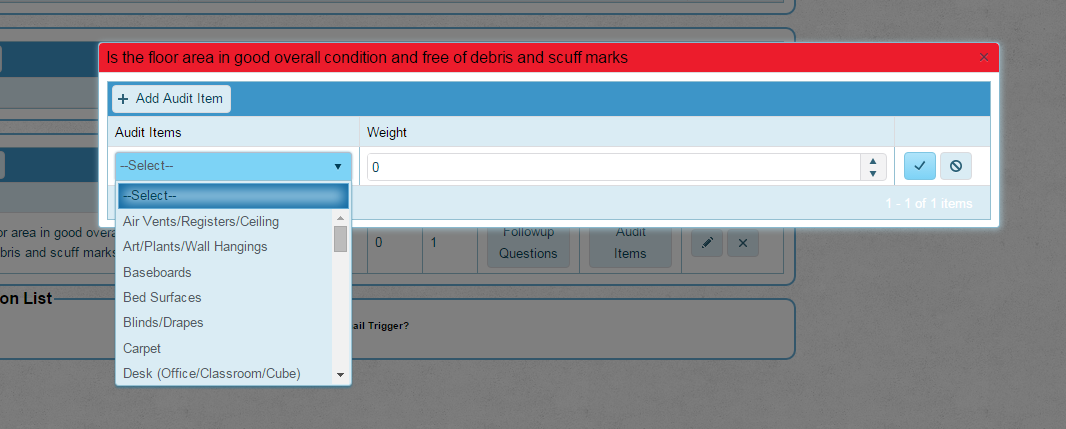
| + | |'''Audit Items''' - Audit items are components or contents of a space that require specific cleaning tasks to be performed on them. These components are corporately controlled in a selectable list and are associated with the corporate cleaning processes such as Space Care QL or Floor Care QL. Each Audit Item has one or more '''Corrective Actions''' associated with it. See ''Scoring An Inspection Template'' for details. | ||
| + | [[File:Select Audit Items.png|/New Inspections version/Select Audit Items.png]] | ||
| + | |||
| + | |- style="vertical-align:top;" | ||
| + | |<big>'''<font size="5">7</font>'''</big> | ||
| + | |Chose '''Required''' if appropriate. A user may not save an inspection unless they have answered all required questions. | ||
| + | |||
| + | |- style="vertical-align:top;" | ||
| + | |<big>'''<font size="5">8</font>'''</big> | ||
| + | |Click '''Save''' on this row. | ||
| + | |||
| + | |- style="vertical-align:top;" | ||
| + | |<big>'''<font size="5">9</font>'''</big> | ||
| + | |Repeat for as many questions as needed. | ||
| + | |} | ||
| + | |||
| + | |||
| + | |||
| + | ==Create an Inspection or Generate Multiple Inspections== | ||
You may now create a single Inspection in order to inspect one work item, or you may have the system generate multiple inspections based on the information that you give it. | You may now create a single Inspection in order to inspect one work item, or you may have the system generate multiple inspections based on the information that you give it. | ||
| − | ====Create a | + | ====Create a Single Inspection==== |
| − | + | {| class="wikitable" | |
| + | |- style="vertical-align:top;" | ||
| + | |<big>'''<font size="5">1</font>'''</big> | ||
| + | |From the main menu, select '''Inspections'''. | ||
| − | [[File: | + | [[File:MenuInspections.png]] |
| − | + | |- style="vertical-align:top;" | |
| + | |<big>'''<font size="5">2</font>'''</big> | ||
| + | |From the top right of the screen, click on '''Generate Inspections''' icon. | ||
| + | [[File:InspectionGenerate.png]] | ||
| − | + | |- style="vertical-align:top;" | |
| + | |<big>'''<font size="5">3</font>'''</big> | ||
| + | |If you have access to multiple Campuses, select the appropriate '''Campus'''. | ||
| − | + | [[File:Create Inspection.png]] | |
| − | + | |- style="vertical-align:top;" | |
| + | |<big>'''<font size="5">4</font>'''</big> | ||
| + | |Choose from one of the options: | ||
| − | + | [[File:Create Inspection - Work Request.png|/Inspections New Version/Create Inspection - Work Request.png]] | |
| − | + | |- style="vertical-align:top;" | |
| + | |<big>'''<font size="5">5</font>'''</big> | ||
| + | |Add by work request allows you to search for a work request by entering the work request number or any text that might be in the work request. The system returns a list of matches for what you type in the field | ||
| − | + | [[File:Work Request Inspection Templates.png|/Inspections New Version/Work Request Inspection Templates.png]] | |
| − | + | |- style="vertical-align:top;" | |
| + | |<big>'''<font size="5">6</font>'''</big> | ||
| + | |Select a Template from the dropdown. | ||
| − | + | [[File:Create Inspection - Space Type.png|/Inspections New Version/Create Inspection - Space Type.png]] | |
| − | + | Add by Space Type allows you to Inspect a room that is not defined in your inventory. | |
| − | + | |- style="vertical-align:top;" | |
| + | |<big>'''<font size="5">7</font>'''</big> | ||
| + | |Enter a Room Name in the Free text field and select a space type from the dropdown. | ||
| − | + | '''Note''': Only templates that have the correct Space Group in their Space Group list will show up in this list. If the Template that you would like to use is not showing up, please check the Space Group of the space you have chosen and refer to the Section titled ''Associate Space Groups'' above. | |
| − | + | [[File:Create Inspection - Space Auto Complete.png|/Inspections New Version/Create Inspection - Space Auto Complete.png]] | |
| − | + | ||
| − | + | |- style="vertical-align:top;" | |
| + | |<big>'''<font size="5">8</font>'''</big> | ||
| + | |Add by Space allows you to type a room number/name and it will provide a list of room level spaces that match what you have typed. You then select the space you want. | ||
| + | |- style="vertical-align:top;" | ||
| + | |<big>'''<font size="5">9</font>'''</big> | ||
| + | |Select from the list of associated templates. | ||
| − | + | [[File:Create Inspection -Area Auto Complete.png|/Inspections New Version/Create Inspection -Area Auto Complete.png]] | |
| − | + | ||
| − | + | ||
| − | + | ||
| − | + | ||
| − | + | |- style="vertical-align:top;" | |
| + | |<big>'''<font size="5">10</font>'''</big> | ||
| + | |'''Add by Area''' works the same as space but it searches at an Area level. Type an area name and you will be presented with a list of areas that match what you typed. | ||
| − | + | |- style="vertical-align:top;" | |
| − | + | |<big>'''<font size="5">11</font>'''</big> | |
| − | + | |Select from the list of '''Areas'''. | |
| + | Type a '''Space name''' if appropriate. | ||
| + | Select a '''Space type''' from the drop down. | ||
| + | Select a '''Template''' to use. '''Note''': Only templates that have the correct Space Group in their Space Group list will show up in this list. If the Template that you would like to use is not showing up, please check the Space Group of the space you have chosen and refer to the Section titled ''Associate Space Groups'' above. | ||
| + | |||
| + | [[File:Create Inspection - Other Templates.png|/Inspections New Version/Create Inspection - Other Templates.png]] | ||
| + | |||
| + | |- style="vertical-align:top;" | ||
| + | |<big>'''<font size="5">12</font>'''</big> | ||
| + | |'''Add Other''' provides list of templates that have a Template Type of Other. | ||
| + | Select the Template | ||
| + | After choosing any of these options and selecting the appropriate template please Click '''Save.''' | ||
[[File:Save.png]] | [[File:Save.png]] | ||
| − | + | |- style="vertical-align:top;" | |
| − | + | |<big>'''<font size="5">13</font>'''</big> | |
| + | |The new Inspection will immediately be presented for Scoring. | ||
| + | [[Score the Inspection]] | ||
| + | |} | ||
| − | ====Generate | + | |
| − | + | ====Generate Multiple Inspections==== | |
| + | {| class="wikitable" | ||
| + | |- style="vertical-align:top;" | ||
| + | |<big>'''<font size="5">1</font>'''</big> | ||
| + | |From the main menu, select '''Inspections''' | ||
[[File:Inspections.png]] | [[File:Inspections.png]] | ||
| − | + | |- style="vertical-align:top;" | |
| + | |<big>'''<font size="5">2</font>'''</big> | ||
| + | |From the top right of the screen, click on the '''Generate''' icon | ||
[[File:InspectionGenerate.png]] | [[File:InspectionGenerate.png]] | ||
| − | + | ||
| − | + | ||
| + | |- style="vertical-align:top;" | ||
| + | |<big>'''<font size="5">3</font>'''</big> | ||
| + | |You will be presented with the following screen | ||
[[File:InspectionGeneration.png]] | [[File:InspectionGeneration.png]] | ||
| − | + | |- style="vertical-align:top;" | |
| − | + | |<big>'''<font size="5">4</font>'''</big> | |
| − | + | |If you have access to multiple Campuses, select the appropriate Campus | |
| − | + | Select a '''Building''' | |
| − | + | Select a '''Floor''', '''Area''' and '''Space Type''' if appropriate | |
| − | + | Choose a '''number of Inspections''' to generate | |
| − | + | Choose a '''template''' to use if appropriate. If you do not choose a template, all available templates will be used for each space. | |
| + | Click '''Generate''' | ||
| + | [[Score the Inspection|Score the Inspections]] | ||
| + | |} | ||
Latest revision as of 16:49, 14 May 2016
Contents
Generate Inspections
Generating an Inspection in FacilityFit consists of two steps.
| 1 | Create an appropriate template (Optional)
An Inspection Template is a form that is used to create a new Inspection when needed. The template has all of the information required to create an inspection, such as the questions that need to be answered, the type of space to be inspected and the attributes to be recorded. Note that an Inspection Template only needs to be created if an appropriate Template does not already exist in the system. If an appropriate Template already exists, you may skip to step 2. |
| 2 | Create an Inspection or Generate Multiple Inspections
Once the Templates are in place, you may create Inspections from them. An Inspection represents a singe point at which work is reviewed and questions are answered. You may create one if you want to review a specific work item, or you may have the system generate several inspections by a given set of rules. |
Create an Appropriate Template
Set up the General Information
| 1 | From the main menu, navigate to Administration
|
| 2 | You will be presented with the following screen
Enter a Description. |
| 3 | Leave Selectable checked. |
| 4 | Change the Target Percentage. This is the final score that is needed for the inspection to Pass.
Choose an Inspection Target. This is where you choose if the Inspection is for a Space, Work Order, or Other item. |
| 5 | Enter a Report Header and Report Footer. Report Headers and Footers are information that needs to be included on every inspection. Any notes that must show on each inspection should be entered here. Headers print at the top of the Inspection and Footers print at the bottom. |
| 6 | Choose a Type. This will be the type of Inspection that is created. This is for grouping and reporting purposes. You may create a new Inspection Type if needed. |
| 7 | Click Save
|
| 8 | Find the template you just created and and select the Edit button. |
Associate Space Groups
| 1 | Associated Space Groups tell the system what types of Spaces may be inspected with this Template. For instance, some questions may only be valid for a patient room and others may only be valid for non-patient areas. Choosing the right Space Groups ensures that you are asking the right questions for the space being inspected. |
| 2 | Click Add Space Group. |
| 3 | Choose a group. |
| 4 | Choose a frequency. |
| 5 | Check Generate if appropriate. This will allow the Template to be used during Inspection Generation. |
| 6 | Click Save on this row. It is the button with the check mark. |
| 7 | Repeat for as many space groups as needed. <img src='/isiswebhelp/Attachments/Warning24.png'>
Inspections may only use this template if the space chosen is in the Space Group list for the Template. |
Create Attributes
| 1 | Attributes are questions that should be answered for record keeping, but do not count against the final score of the Inspection. For instance, it might be important to know if a hospital room is occupied when being inspected as this might affect the inspection process, but the answer does not change the Pass/Fail score. |
| 2 | Click Add Attribute |
| 3 | Choose a defined Attribute type. You may create a New Inspection Attribute if needed. |
| 4 | Choose Required if appropriate |
| 5 | Click save on this row |
| 6 | Repeat for as many attributes as needed |
Create Questions
| 1 | Click Add Question
|
| 2 | Modify Order if needed. The questions are displayed in order from lowest to highest. |
| 3 | Type the text of the question |
| 4 | Enter a weight. The weight indicates how important a question is. If all of the weights are the same then all questions are equally important. If you give one question a weight of 2, it will then be counted as twice as important as another question that only has a weight of 1. |
| 5 | Select a score type. You may create a new score type if needed. |
| 6 | Audit Items - Audit items are components or contents of a space that require specific cleaning tasks to be performed on them. These components are corporately controlled in a selectable list and are associated with the corporate cleaning processes such as Space Care QL or Floor Care QL. Each Audit Item has one or more Corrective Actions associated with it. See Scoring An Inspection Template for details. |
| 7 | Chose Required if appropriate. A user may not save an inspection unless they have answered all required questions. |
| 8 | Click Save on this row. |
| 9 | Repeat for as many questions as needed. |
Create an Inspection or Generate Multiple Inspections
You may now create a single Inspection in order to inspect one work item, or you may have the system generate multiple inspections based on the information that you give it.
Create a Single Inspection
| 1 | From the main menu, select Inspections. |
| 2 | From the top right of the screen, click on Generate Inspections icon. |
| 3 | If you have access to multiple Campuses, select the appropriate Campus. |
| 4 | Choose from one of the options: |
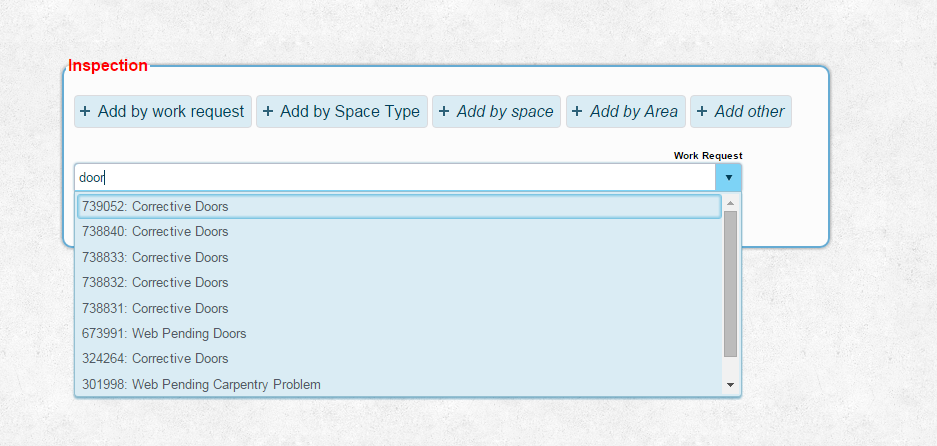
| 5 | Add by work request allows you to search for a work request by entering the work request number or any text that might be in the work request. The system returns a list of matches for what you type in the field |
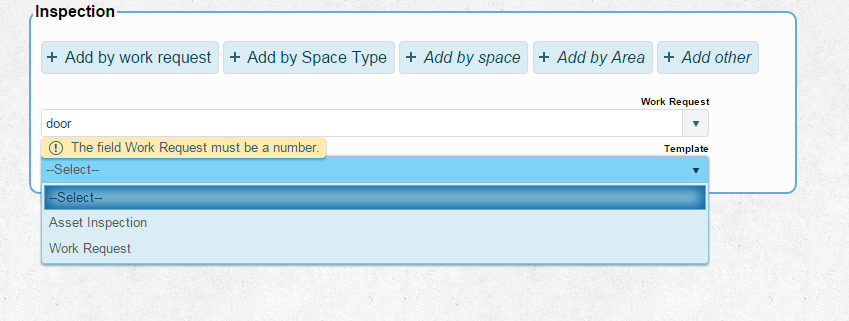
| 6 | Select a Template from the dropdown.
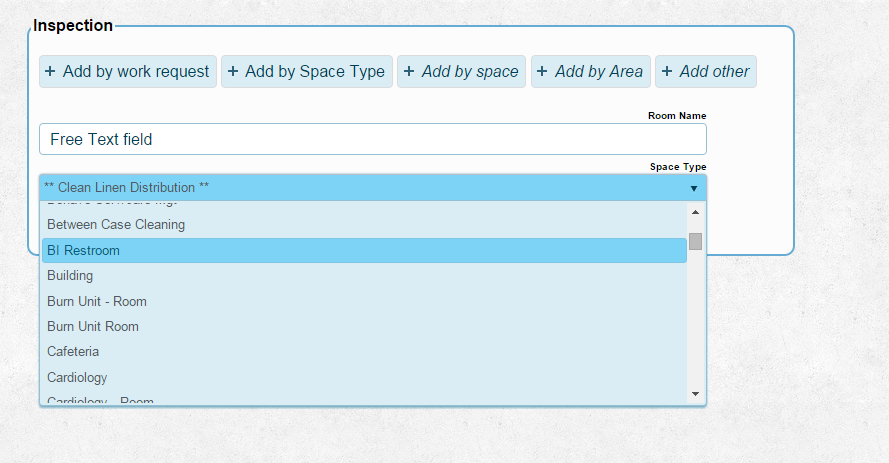
Add by Space Type allows you to Inspect a room that is not defined in your inventory. |
| 7 | Enter a Room Name in the Free text field and select a space type from the dropdown.
Note: Only templates that have the correct Space Group in their Space Group list will show up in this list. If the Template that you would like to use is not showing up, please check the Space Group of the space you have chosen and refer to the Section titled Associate Space Groups above. |
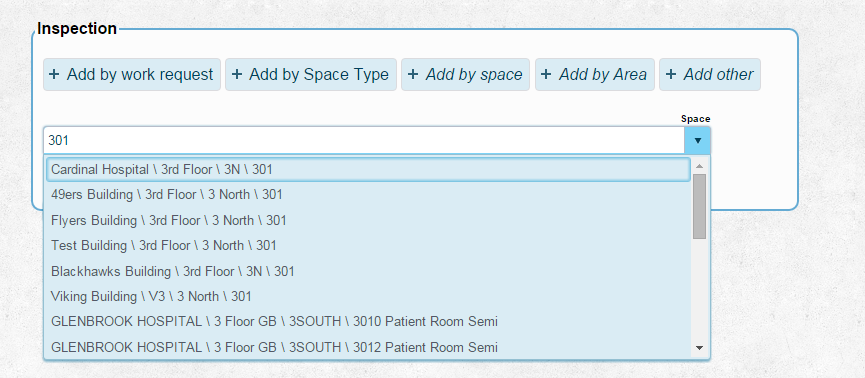
| 8 | Add by Space allows you to type a room number/name and it will provide a list of room level spaces that match what you have typed. You then select the space you want. |
| 9 | Select from the list of associated templates. |
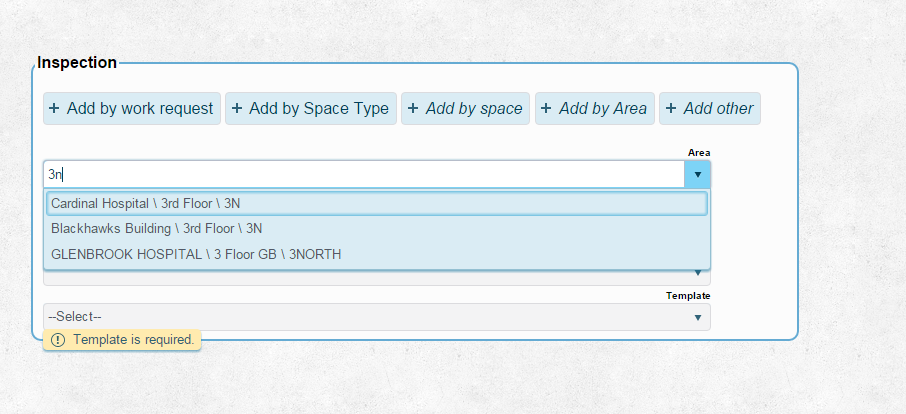
| 10 | Add by Area works the same as space but it searches at an Area level. Type an area name and you will be presented with a list of areas that match what you typed. |
| 11 | Select from the list of Areas.
Type a Space name if appropriate. Select a Space type from the drop down. Select a Template to use. Note: Only templates that have the correct Space Group in their Space Group list will show up in this list. If the Template that you would like to use is not showing up, please check the Space Group of the space you have chosen and refer to the Section titled Associate Space Groups above. |
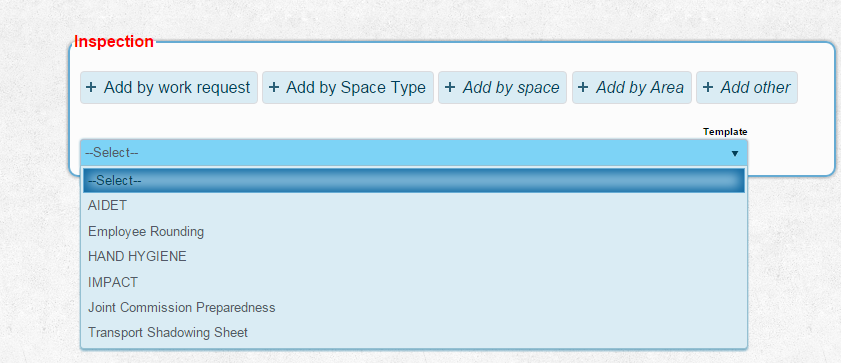
| 12 | Add Other provides list of templates that have a Template Type of Other.
Select the Template After choosing any of these options and selecting the appropriate template please Click Save. |
| 13 | The new Inspection will immediately be presented for Scoring. |
Generate Multiple Inspections
| 1 | From the main menu, select Inspections |
| 2 | From the top right of the screen, click on the Generate icon
|
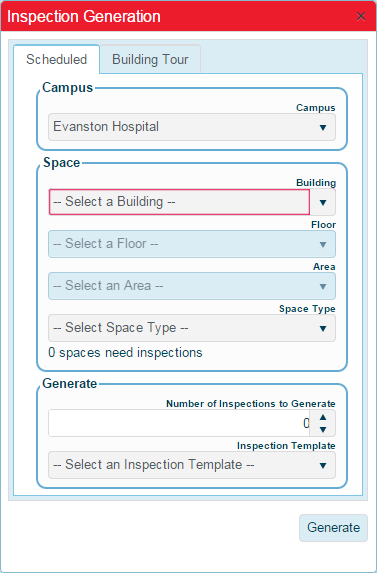
| 3 | You will be presented with the following screen |
| 4 | If you have access to multiple Campuses, select the appropriate Campus
Select a Building Select a Floor, Area and Space Type if appropriate Choose a number of Inspections to generate Choose a template to use if appropriate. If you do not choose a template, all available templates will be used for each space. Click Generate Score the Inspections |
