Space Functional Area
Contents
Description
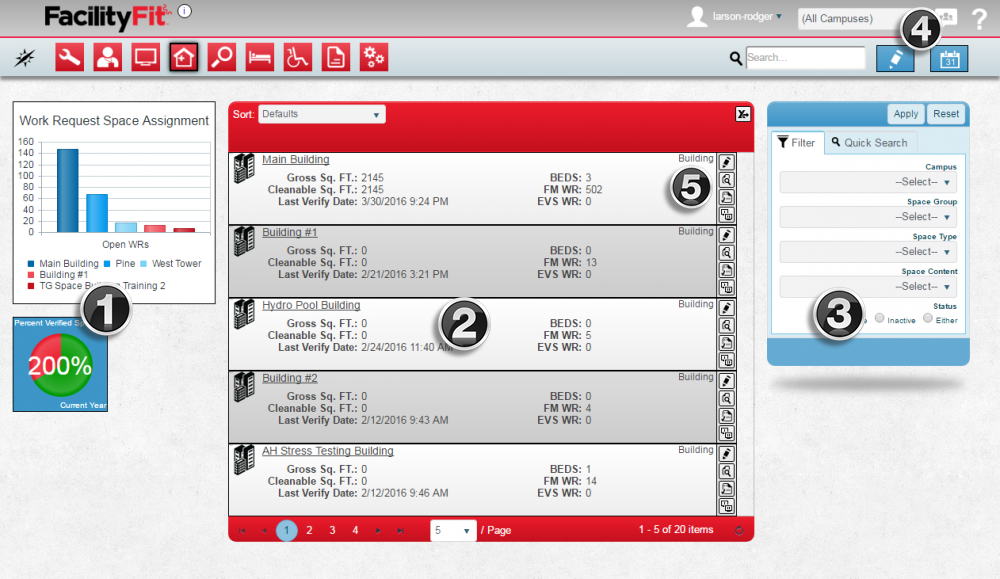
This functional area contains all of the information and actions necessary to organize and understand the physical space of your facility and to schedule cleaning for that space. From this area, you may create new spaces, move them into their appropriate hierarchy, and create cleaning schedules to track tasks which need to be done per the client contract.
Videos
Adding New Spaces to Space Inventory
Screen
Metrics
Work Request Space Assignment - the number of work orders currently open per building
Percent Verified Spaces - the percentage of spaces which have been verified in the last year
List Display
The first display you see will show you the buildings for each campus that you have access to. You may then click on the name of the space to be taken to the next level of the hierarchy. For example, clicking on a building will show the list of floors in that building. The list shows the following fields:
| Space Name | |
|---|---|
| Gross Sq. Ft. - the sum of all space in the space and contained spaces | Beds - The number of hospital beds in this space or all contained spaces |
| Cleanable Sq. Ft. - the sum of all space that needs to get cleaned | FM WR - The number of work orders for FM in this space or all contained spaces |
| Last Verify Date - The last time the space was manually verified for correctness | EVS WR - The number of work orders for EVS in this space or all contained spaces |
The icons indicate what type of space you are looking at:
| Building | Floor | ||
| Area | Room |
Step-by-Step Help
Actions
| Help Page | Button | Description |
|---|---|---|
| Editing Spaces | To add new spaces, from the Spaces home window, click the blue Edit icon or click the Spaces button and select Create from the dropdown. | |
| Spaces-Navigate to Scheduler | To add or edit a housekeeping schedule, from the Spaces home window, click the blue Navigate to Scheduler button.
or click the Spaces button and select Scheduling from the dropdown. |
Quick Actions
The quick actions available are:
| Help Page | Button | Description |
|---|---|---|
| Edit Spaces | |
Edit - Brings up the full details of the space, showing the full hierarchy and allows you to edit any and all fields of the space |
| Spaces-View Schedules | View Schedules - Show the schedules that this space is assigned to | |
| Spaces-Verify Now | Verify Now - Verify the space, indicating that you have visually verified that the space has not changed either in size, contents, or hierarchy. | |
| Spaces-Print Preview | The Print Preview button opens the space report. |
Filtering
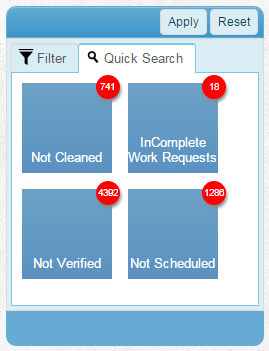
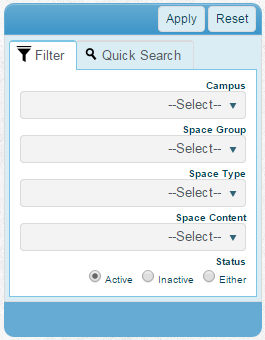
Finding spaces can be done in a handful of ways. First, there are 4 quick searches provided as shown. These include:
Other Actions
| Edit - Edit the space information | |
| Navigate to Scheduler - Create or change schedules associated with cleaning a space |
Add Space Control Buttons - See the 7 blue action buttons on the upper right of the add space window:
![]() Save - To save your changes or sometimes to save your changes and move to the next screen.
Save - To save your changes or sometimes to save your changes and move to the next screen.
![]() Update Child Spaces - To update child spaces.
Update Child Spaces - To update child spaces.
![]() Clone Spaces - Clone a space into another space or clone a room into multiples.
Clone Spaces - Clone a space into another space or clone a room into multiples.
![]() Organize Space - When activated allows rooms to be reorganized using drag and drop.
Organize Space - When activated allows rooms to be reorganized using drag and drop.
![]() Add New Child - used to add sub-spaces within a space (add Floors to Buildings, Areas to Floors etc.).
Add New Child - used to add sub-spaces within a space (add Floors to Buildings, Areas to Floors etc.).
![]() Delete - To delete a selected space.
Delete - To delete a selected space.
![]() Print - To open the print preview window.
Print - To open the print preview window.
Related Areas
The icons indicate the current status:
| Building |


